Thursday, October 27, 2016

Re-VTG'd

Today I spent some time pottering around in the train room on a few infrastructure projects before - in a valiant effort to avoid the soldering iron - began tinkering with a few projects that might start soon. Unfortunately, these will require use of an airbrush - my second most hated item of modelling equipment. 

In the meantime, you may remember that I trashed one of my VTG tarp wagons to steal its Y25 bogies to build that container car a while back.   In the meantime, I've bought a set of these horrid hi-rider side dump cars as a bogie-source and since I saved the old blue top, thought it might be worth an attempt to re-wheel it. 

With a bit of surgery, the top squeezed on, even if the chassis is a little longer on the wagon at left now and its missing its side tie-downs that are now on the container wagon. Still, it looks ok from a distance, its good to have four of those fairly nice blue wagons back again, and certainly is a better use of these bogies than the lanky-yellow-stilt-wagon in the foreground.

Finishing the yard

As promised, the yard tracks have been connected and the glue holding them to the baseboard is setting as I type.

After the slight rationalisation, there are now three 'out' tracks, two at the front that hold a 'standard' sized train and one - where the hopper train is sitting here - that is about a foot longer. All double ended passing loops.


In the distance at left is the 'inbound' mainline with a single ended siding behind it that a 'long' train can back into. The turnout for this is placed in the far distance such that a train running past on the in/down mainline comes in trailing around the curved leg of the switch, whereas backing in to the siding occurs though the straight leg.

Here is a video of the first train to run over the whole line since the yard was debugged.


Sorry about the thumb over the lens....!

Rather than using an 0-5-0, I ran the train 'uphill on the downhill track' to the top level with the intention of manually flipping the locos to the correct end of the train to run downhill for the video. Alas, near the top it ran over a pin I had left stuck in the middle of the track and my heart skipped a beat as the two locos headed to the concrete floor. You can just make out the train of orange hoppers and look at the lovely hard floor that they landed on... 


Somewhat surprisingly given the explosion of parts when they landed, the locos survived with both chassis running immediately afterwards as if nothing had happened. Both required the light boards be reinstalled at each end, the body placed back on the chassis, and one required a buffer and four side windows to be reattached. Incredible really.
In the ER

Now that the track seems to work pretty well (other than idiot-induced accidents) the next major step will be to finish wiring up the electrical blocks that will be used to store trains in the yard sidings.

Tuesday, October 25, 2016

Weekus Horribilis

Its been a frustrating week here in New Zedland.

Following on from the last post, I think I might have been a bit optimistic in some of my approaches in the storage yard lately without testing them thoroughly before committing. Z scale can be finicky and while I had no problems on the main line, I can't have this yard being a point of frustration, because that quickly takes the fun out of things.

So I did replace that point which banished the electrical gremlins, but then found that trains were struggling while exiting it reliably because immediately after the point there was a join to Peco flex which has a slightly larger rail profile. And all on a curve. And on a hill - a hill that was steeper than I realised, so trains were struggling out of the yard, putting even more stress on couplers and tiny wheels as they attempted to negotiate the obstacles.


As such, I have today rationalised the yard storage tracks somewhat. Made more difficult by me having soldered a lot of the track together... I also somewhat wisely added a new section of "baseboard' to ensure the left third of the yard - from the Muhle tunnel portal on to where the locos are here - descends to the flat in a far more gradual and smooth manner.

In the process, I have lost a siding (FYI pushing Z scale stuff around curves through points doesn't work as well as it worked running downhill on the mainline) and have regrettably lost some siding length as well, but now all the points are easy to get to,  have reasonable transitions and most importantly, it all seems to work well now. I have one more siding to finish connecting and then the soldering iron will be out in action again (sigh).

Tuesday, October 18, 2016

An appointment with the soldering iron

Its a necessary evil, soldering.

I detest the welding of wires and would far prefer to be diving into the scenery, but without a few well-placed cables stuck to the rails, the trains don't move far.

My z-scaled paranoia has only made things more difficult by insisting on lots of feeders, jumpers and sections of 'continuously welded rail'.

So far I've got most of the existing track fed with wires, and by temporarily joining the correct ones together, was able to run a train down from the highest section of 'down' mainline, down through the various spirals and levels into the yard, around the bend and back uphill to the highest section of 'uphill' mainline.


As you can see its all splendid apart from those two points. The one at the left has had no issues until today but now the frog and point blades seems to have died. The one at right only played up for this video, but I hope its not a harbinger of bad things to come.

This is a bit of a bugger. They'll be hidden from the outside world, but I don't want to have to be nudging things along like this...

The are both Micro Trains monsters. I can't find any issues on the web but that might be because most Z scale modelers do so from the safety of their armchairs.


I have two options here.

1. Try to power the frog somehow (presumably via a slide switch/pushrod activator
2. Replace the problematic with a spare

If I do the latter, there is a weird internal spinney arrangement underneath that I might have a look at on the dead one to see if I can figure out how these work. I don't know why point makers don't just install a more reliable power-routing mechanism in the point throwing mechanism that powers the frog. Has anybody figured this out in any scale??


Tuesday, October 11, 2016

Yardstick

With the layout back in one piece, its probably as good a time as any to tackle the yard.

After a bit of fiddling and experimentation, I'm going to end up with storage for at least 4-6 trains down there, depending on how you count things, plus between 1-3 up top. Plus one each way on the mains if things get really hectic.

Also, every track is well over the length of my 'test train' of 12 hoppers and two locos, with three of the storage tracks being about 50% longer - far more than the current loco fleet can haul.  Not bad for a layout of less square area than a door!

The schematic for the downstairs yard looks something like this:

As can be seen, two of the sidings are single-ended - so trains will back in or out.

Now for some baby steps... As I'm using straight DC power at this stage, I'll need to electrically isolate the sidings and only have them energised when I want them active - or else all 10 trains will move at once. I don't have any isolating rail joiners, but luckily a passing Jokertrekker let me borrow his Dremel and a cut-off wheel. My old 110 volt one having been donated to a model railway club when I left the US.

Cuts were made across rails mid-section thus (the plastic 'ballast' keeps everything together):


And then track was soldered at the rail joiners into sections:

And then everything started to come into place quite quickly:

She's lookin' good, Vern.


Hopefully workable at least, and probably with a little room for expansion. I'm a little short of track at the moment - as the intended clandestine meetup with my dealer of such items didn't work out a few weeks ago - so I'll be one loop short for a while.

In the meantime I have the track nearest the edge to connect up and some soldering of power feeds and the like to keep me busy.

Sunday, October 9, 2016

Getting the Band Back Together

Wassen has moved.

As this had been anticipated, the layout was effectively built in two 'halves' that were pinned together where foamboard sections met at the border. Track that had been finalised was glued down except for sections that crossed the border, and here it had been pinned down temporarily.

Thus when the time came to move, it was an easy task to remove a dozen pins, gently unplug the tracks, and then the two layout halves separated easily. Although each half is fairly large and an awkward shape, if you can find the right balance point, they can be easily picked up with a few fingers thanks to the lightweight and somewhat shonky construction methods employed.

The two halves were carefully stacked on top of each other in the back of a hatchback car and driven away into the sunset.

Now in a more permanent location, they have been reunited and joined for good.

My initial thoughts as to next steps were to get some yard track laid, but pragmatically, I spent last night bolstering the new border joins with extra bracing. As with most layouts of this shape, the whole thing is pretty strong and stable except for in a twisting motion, but the whole thing should stiffen up when some scenery starts to grow in the vertical dimension.

A view from on high. The temporary top level has been omitted for clarity.
And because it would have fallen off. 
This is why I'm not an architect. Luckily not too many people will see this underside.

Sunday, September 25, 2016

Back with the Passenger

Greetings dear listener.

I’ve returned to the layout after an absence of a few months but have not been completely idle, for my ebay and bargain-hunting fingers have been toiling over a hot keyboard in the interim to procure a number of goodies that were unpacked this morning.

One of these items is a Swiss passenger train - Marklin’s SBB Eurocity set, “87662”. 


This is a set of 4 cars, which are supposedly: one 1st class car, one 1st class panorama car and two 2nd class vehicles. The set is presented in the ‘previous’ SBB carriage livery of white, black and grey, whereas the current cars lose the grey and look very smart in their black and white with flashes of red; with a little yellow as required to signify first class.


First impressions: These are pretty neat, especially the panorama car which I think is rather nicely done and matches the prototype well. One thing that really stands out with the set, as you may see above in comparison with one of the red hopper wagons that you’ve seen in previous posts, is that they are really, really, really long, so they do look a bit silly on tight curves. 


I thought these red tarp-topped cars below were pretty long, but they seem tiny in comparison. I’ll have to be careful when trains pass each other on curves!


As for the prototype, the real InterRegio trains usually have six cars or more, but four seems to be (literally) an uphill struggle for a single Z scale Re 4/4 (although one of the cars seems a little less free-rolling that the others), four it will be for now. 

The real trains usually have a 4/4 or sometimes an Re 460 on the head, with the occasional appearance of two 4/4s, which if run on the model would enable me to haul 6 or 7 cars if I was to find another set cheaply and sell the extras, as the real trains only have one pano car regardless of length, and on the Gotthard it always seems to be located second car from the north end of the train.

During peak periods (August summer holidays and ski weekends for example) the train can be a almost a dozen cars long, often filled out with older green cars, as can be seen behind the Re 460 picture at Wassen in the previous post.

At the real Wassen, there is northbound/downhill InterRegio train that goes through the station at :20 past the hour and an uphill at about :45. Other Inter City passenger services are provided by Pendolino derivatives of varying aesthetic appeal.

You can see the obvious black and white with red flashes look in the pictures below vs the grey on the models above.
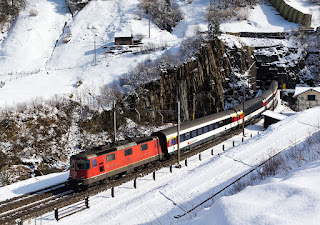

There are a few things I’d like to do to improve these cars, with the most obvious being to get rid of those grey stripes. Other than the Pano car, I don’t know whether the other three are really models of SBB prototypes or (as seems quite common with Marklin) if they’re German cars repainted in Swiss livery. Certainly looking at the prototype pics, there are too many ‘opening’ windows and various details that seem a bit off (those grills in the middle of the 2nd class cars for example) but time will tell whether I care enough about these details to go changing them. We’ll save that for an upcoming instalment.