It feels good to be home again after a month away...
While on Europe's fair shores, I picked up six second-hand Z scale items; a few of which are hidden in this picture:
Firstly, I tracked down a red Re 460 to lead the passenger train at a reasonable price. These locos are all over the passenger trains in Switzerland, and while 99-point-something percent of them are red like this, Marklin has, for twenty years, focused on churning out the various 'advertising' paint schemes for collectors... but no updated 460.
The red ones are hard to find in Z, and Lokmuseum says this model (88441) was produced between 1996-98, so it is well over 20 years old, with the prehistoric (two versions ago) three-pole motor.
The model looks sharp though, and in very good external condition, but I don't even know if it runs. We will get to that in a future installment. It will also need to be updated slightly, as it has the '2000' marking and no SBB directional arrows on the nose.
Behind the 460 above, you might see SBB passenger cars with the old green stripes along the windows. Three were acquired - one will be repainted in the white scheme to match the rest of the cars prepared a while back. Two will remain in this scheme (albeit slightly updated) as 'overflow' cars that were commonly tacked onto the InterRegio trains to increase the number of seats available during the high season. For example:
Interestingly, these older cars seem to roll better than some of my newer passenger cars. All were bought second-hand, and perhaps some have led more difficult lives than others!
Monday, May 20, 2019
Saturday, May 11, 2019
Nothing to see here
Apologies for the delay in postings, but as mentioned, I've been "in the field doing research" and should be back with the layout again in a few weeks time.
I managed a detour to Switzerland - mainly running around on the RhB narrow gauge in the southeast - but I did catch a few of the old machines floating around on the SBB network.
An Re 4/4 at Mols:
And I suppose, as Immensee is considered the northern end of the Gotthard Bahn, we'll consider the second picture relevant to a blog about a town on that former line:
Good to see quite a few of the classic Gotthard Re 10/10 combos still running on the route, albeit as they head south these days they are well beneath Wassen town in the base tunnel.
Sunday, April 14, 2019
An ETR610/RABe 503 in Z scale? - 1
Of all the 'plastic' passenger trains over the Gotthard, I reckon the ETR600/ 610 / RABe 503 design shared by SBB and Trenitalia are the sexiest - far sleeker than the older ETR 470 and blobby RABDe500s.
![]() |
| Near Silenen |
So imagine my surprise when I found them available on Shapeways.
Very nicely modeled (and well printed too, Mr Shapeways). Until they release a clear plastic material for printing window inserts, I'd have made the windows filled-in, but this shouldn't be a drama as they are in a black panel anyway. Given the small scale, I'll probably pop a sandwich of black plastic and glazing behind the window openings.
As for power, this is yet to be determined based on testing, but the two contenders are:
- A Rohukan three-car Shinkansen - surprisingly, the middle car is powered and not the ends as expected
- Three Rohukan 'shorty' power cars (the wee black one below). Given the low price of these, I figured they were unpowered trailers that I'd harvest bogies off for the other three cars, but it turns out they are powered...
The original plan was to use two powered Shinkansen cars and have the rest of the cars unpowered (but as I say, it turns out I only have one power car).
Depending on how these types play together and how much power I need to get up my grades, I may use the Shinkansen on its own towing unpowered Shorties, or just the Shorties, or a mix on the train.
The Shorties will be lengthened of course, and the Shinkansen sets (or the car shells above them) need to be adjusted a little too. The Shinkansen chassis is surprisingly wide too, so needs a bit of thinning. I had hoped to use the undersides as they are, as they came with some nice side skirt detail that looks about right, but they are two wide for the Shapeways tops.
I'll leave you in suspense for a few weeks here, as I am being forced to go to Europe for some more 'field research'.
Thursday, March 28, 2019
Hotel Alte Post - 2
This won't be a very informative post, as I didn't take a lot of additional pictures of day two of the Alte Post construction ...as it all came together quite quickly...
Basic side walls and and an even more basic rear wall (brown pre-scribed sheet wood with a (badly cut out - as you can see) stiffening card piece.
You might note that the 'wings' supporting the side balconies - visible in the previous post - were removed - they seemed a bit high-up on the building so I removed them and added them further down the sides to line up with the 'third' floor (as counted by Europeans and others not believing in a 'G' floor)
Yellow coloured pencil was used for the window frames in the lower floor, the window-box flowers were as per the 'Upper Wassen' farmhouses detailed earlier.
The roof was the usual one-piece plastic stone/brick sheet to represent shingles, all folded up and contact glued in place.
Side steps are a small trapezoidal piece of foamboard with steps drawn on.
I still need to make up a large vertical 'HOTEL' sign on the computer - the other signage and the little Xs on the window shutters were hand-drawn with a fine pigment pen in a fit of lazy impatience. As usual with most of my models, it is the effect of the scene and the illusion of detail within it that I hope resonates, not the individual details (or lack of them)!
The general shape (forced perspective narrowness aside) looks quite decent from road level, not that it will ever be seen from this angle on a Z scale layout!
Roughly placed on the layout:
In these pics it seems I should have put more black into my brown-wood mix, as the real Alte Post colour is almost black. Might see if that can be corrected....
Sunday, March 24, 2019
Hotel Alte Post - 1
One of the most distinctive buildings in Wassen is the Hotel Alte Post.
This was the first place I stayed on my first visit to the town (above), and just had to be included in the sample of buildings that will populate my model Wassen town.
Construction started using the usual random gustimating and drawing and re-drawing of lines until it looked about right, followed by some knifular commitment:
Yes, the entrance door is supposed to be offset a bit like this, but I'm a little off on my windows in the floor above (there should be fewer on the left-hand bunch). Drat. Hopefully nobody will notice...
A little paint, and it's starting to look half decent - when viewed from a considerable distance:
More to come... Same Bat-time, same Bat-channel.
And a finally, a thank you to Mr Anonymous, who has pointed out that the mysterious building I had labeled the Town Hall in the previous posts is actually a school. I've since corrected these. Cheers. I'm glad we've finally found a useful use for the internet - sharing information. Apparently it's not just for porn, vanity, scammers and to give vain and vile dickless morons a platform for sharing their hate and stupidity afterall... RIP the Christchurch 50.
This was the first place I stayed on my first visit to the town (above), and just had to be included in the sample of buildings that will populate my model Wassen town.
Construction started using the usual random gustimating and drawing and re-drawing of lines until it looked about right, followed by some knifular commitment:
As usual, windows were cut out from the wooden frontage, and a card backing sheet cut so that the windows could be later drawn onto it. This also stiffens up the structure nicely and provides the white concrete lower floor.
Windows (badly) drawn and some details added in a slightly crooked fashion:
A little paint, and it's starting to look half decent - when viewed from a considerable distance:
And a finally, a thank you to Mr Anonymous, who has pointed out that the mysterious building I had labeled the Town Hall in the previous posts is actually a school. I've since corrected these. Cheers. I'm glad we've finally found a useful use for the internet - sharing information. Apparently it's not just for porn, vanity, scammers and to give vain and vile dickless morons a platform for sharing their hate and stupidity afterall... RIP the Christchurch 50.
Sunday, February 10, 2019
Schoolhouse - 2
Today I continued in the same vein as yesterday, putting 'windows' in the sides and making up a rear wall for once (with no windows!)
The walls were stuck together and cross-wall-bits for the dormers added in the roof area as above.
Then came the tricky trial-and-error fabrication of the roof, which is made of the thin brick-embossed plasticard that is being a used a bit around here....
It's close, but not exactly to the design of the original. Don't look too closely....
With a little paint, and hidden a safe distance away among some trees, it looks a bit better (it's just sitting in there and hasn't been attached, so may not be located quite as straight and level as it will soon be). Then again, it may look worse after...
Overall this looks pretty good for a few hour's work. The scale looks ok, and, because it is grey all-over, it doesn't shout out at you to look at it, which is exactly what I'd hoped for.
The walls were stuck together and cross-wall-bits for the dormers added in the roof area as above.
Then came the tricky trial-and-error fabrication of the roof, which is made of the thin brick-embossed plasticard that is being a used a bit around here....
It's close, but not exactly to the design of the original. Don't look too closely....
With a little paint, and hidden a safe distance away among some trees, it looks a bit better (it's just sitting in there and hasn't been attached, so may not be located quite as straight and level as it will soon be). Then again, it may look worse after...
Overall this looks pretty good for a few hour's work. The scale looks ok, and, because it is grey all-over, it doesn't shout out at you to look at it, which is exactly what I'd hoped for.
Saturday, February 9, 2019
Schoolhouse - 1
I had no idea what this building's purpose really is at Wassen, but it's quite distinctive, quite grand, and looks like it could be the town offices and/or town hall. It turns out it is the Schoolhouse - thanks to the commenter who has corrected me here.
The most 'interesting' side with the 'grand entrance' door faces the church, but I'm going to spin it 90 degrees and have it facing the front of the layout. This side has some interesting 3D features - as you can see, it is three layers deep, compared to the sides which are flat. These layers are being modeled, albeit heavily compressed. The real thing has an unusually laid out window pattern on this main entrance side (almost implying that the floors are not level, but I decided to make them line up a little better, at least between the outside and middle levels. Some artistic license, mixed with laziness and a dash of forgetfulness being applied as required.
Levels stuck together:
The inset door is from an offcut from when I shortened my brown house at 'Upper Wassen'.
A few random shapes were cut out Metcalfe N scale stone sheets (this is a stonework pattern printed onto card) and these were tried on for size on the layout.
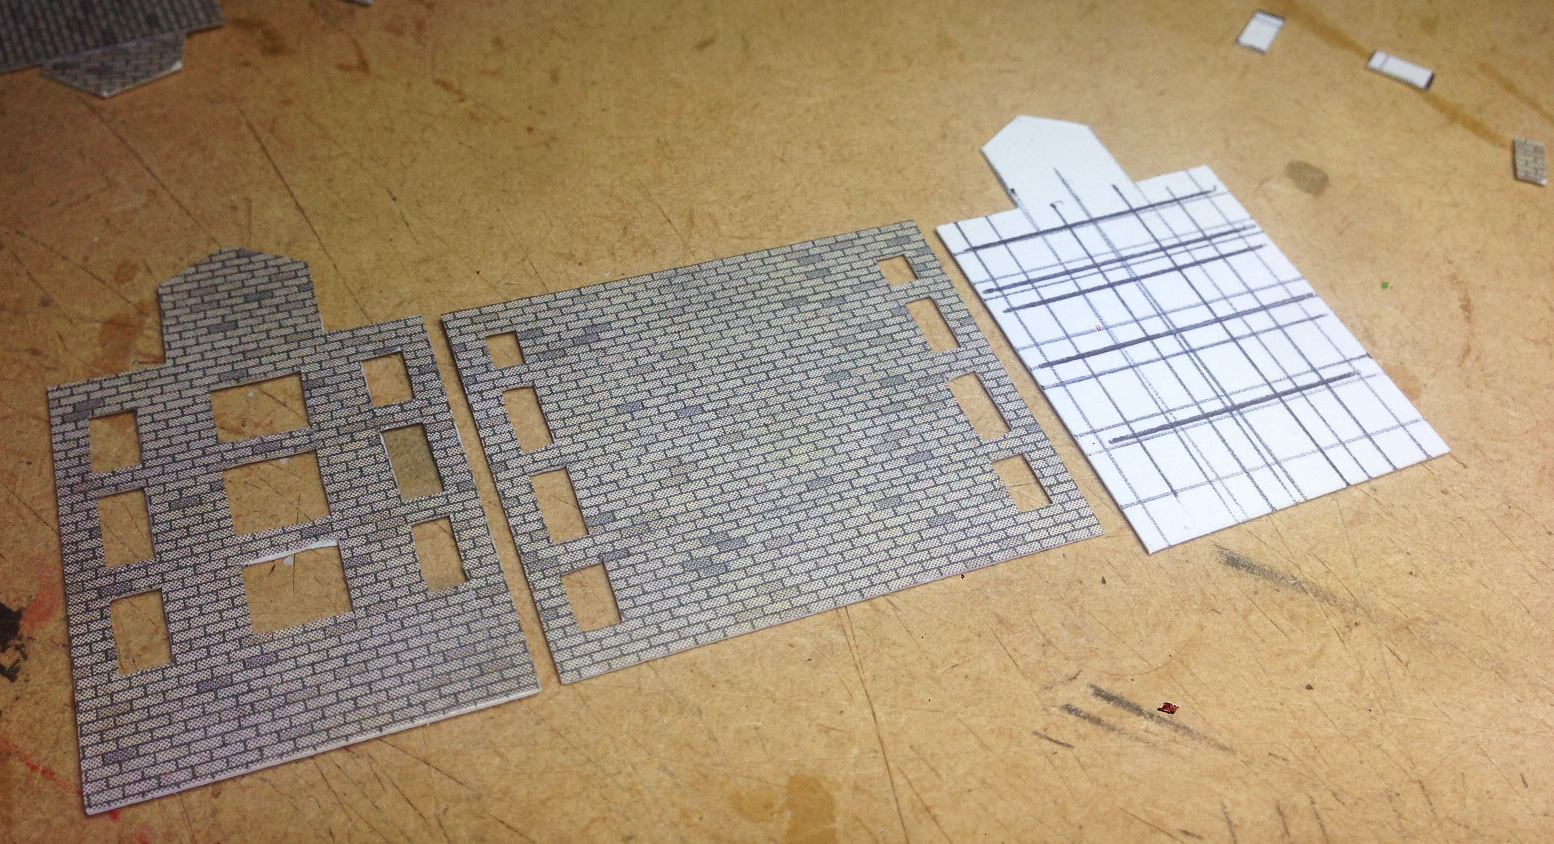
Windows were marked, re-marked, and re-re-marked on the backside at various angles resembling the parallel and perpendicular, such that my cutting pattern on the first-marked wall looked more like a tartan.... Pick a line to cut along... any line...
Pieces coming together in the four prep stages:
- windows cut out
- backed with white card
- 'windows' drawn in and sills marked with a mechanical pencil (and a ruler at times)
- a start at some overlay and detail added around the entranceway
Levels stuck together:
The inset door is from an offcut from when I shortened my brown house at 'Upper Wassen'.
Subscribe to:
Posts (Atom)