Friday, December 13, 2019

Two more 4/4s under the fuzzy microscope

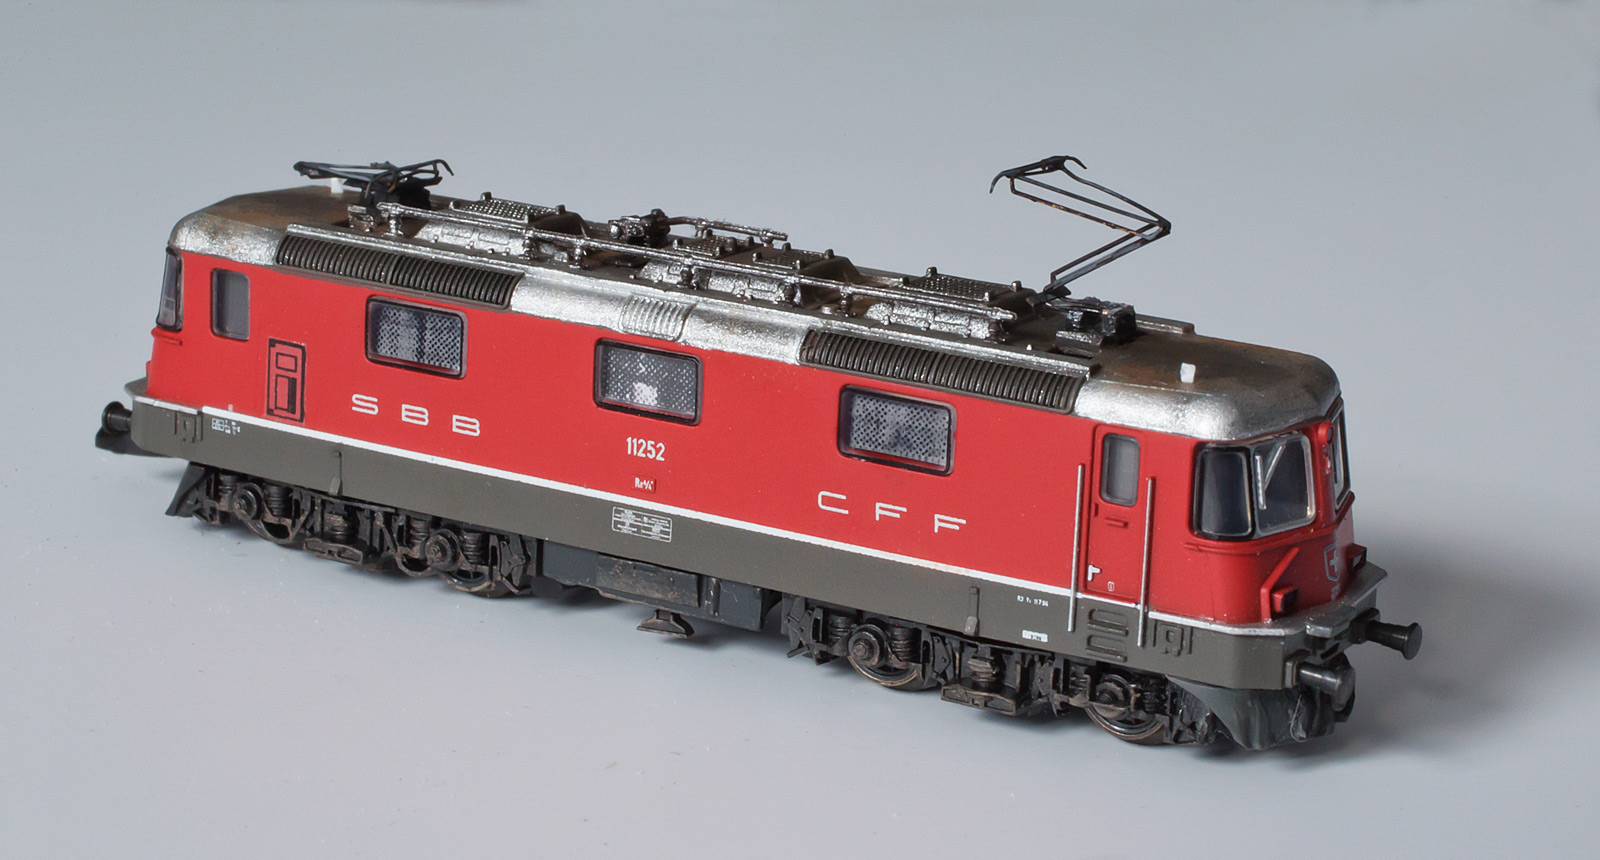
Two more Re 4/4 shells have been undergoing a touchup in fits and starts, with a silver roof, painted front step, replacement etched pantos and some weathering on top completed so far.


Reprinted a/c units are yet to be added. These cellphone pictures reveal all the inaccuracies that my naked eye can't detect - must adjust some of the bends on the pantos on those two. Not that these details are so noticeable when viewing trains running around a layout from the federally-mandated viewing distances...

As I have five 4/4s,  I think the next one that crosses my desk will be weathered more heavily, and there are plenty of possibilities for the last shell.

One 4/4 will be paired up with the 6/6, so that leaves either two pairs, or a triple plus a single I guess. Either way that is three sets, so two more chassis need to be worked to eliminate a coupler.

Tuesday, November 19, 2019

Marklin's Re 4/4 - Improving the looks - 6 - Fertig


There were a couple of wee things that I had intended to add onto the Re 4/4 a long while back but I completely forgot about them in the interim. Must be my intermittent incredibly-early-onset dementia...

Firstly the air conditioners that sit behind the driver's position (near the front of the port side). These were retrofitted top the real things a decade or so ago; and I see that Marklin's recent 'Gotthard Panorama Express' set has an Re 4/4 included that actually has these A/c units printed on the sides, so here's a rare "well done" bouquet from this blog for them.

I figured I'd print an outline of these onto clear decal paper with my laser printer, but it took several frustrating goes at this.

My first effort in photoshop came out all dotty (600dpi, my buttocks).  So, lacking any sensible vector drawing programs that I'm really au fait with, the accountant in me came out and doodled up something in excel.

I started out with some quite detailed ones, but when printed out to each be about 5mm tall they were all black blobs, so I simplified them and even now they look a bit strong. And now that I write this up they are a little small too, so I might do some more a little bigger for the other 4/4s.


The little white aerials over the starboard side of the cab roof were tiny squares of Plasticard glued on that will probably fall off on its first run. I also drybrushed the bogies and underbits lightly.


Saturday, November 9, 2019

Marklin's Re 4/4 - Improving the looks - 5 - Finito


Stock vs improved Marklin Z scale Re 4/4
A few small tasks completed this 4/4 project:

  • A small knob of white paint was slopped between the front windows on the UIC plug
  • The 'step/platform' protrusion (above the starboard buffer) on the front edge was painted gray to match the prototype (it was silver on the model)
  • Added the pantos of course - these looked to be sitting a tad low on the dry run, so they have been raised up further on some tiny rods of styrene
  • A dash more weathering was applied to the roof and pantos. As previously mentioned, the 4/4s are kept fairly clean so I decided not to weather the sides and front.

One small irk remains the front silver-edged windows, which on the model have square corners on the outboard side rather than curved like on the corners facing the middle. I suppose a little dollop of red might sort that out but there is a high probability of making a mess doing that. I suppose I should add the rear-view mirrors on the starboard corners too. Someday...


Is all this worth the effort given that the trains will typically be viewed from a distance? Hard to say. While the stock model looks pretty good, the revisions do improve it. The silver roof and scale pantographs do look good, but now the Z scale flextrack looks awful!

I will have to be very careful with those pantos - its easy to forget they are there when you can hardly see them.

Thursday, November 7, 2019

Marklin's Re 4/4 - Improving the looks - 4 - Roof

Most of the SBB Re 4/4s that I saw on the Gotthard were clean enough to see that they had a silver/light grey roof:


Whereas the Marklin ones have the same dark grey used at the base of the body. This isn't a terrible faux-pas because the roof weathers with carbon from the pantograph over time, but I felt that painting the roof silver might make an improvement visually.

Before that was done, the bolt hole for the Marklin panto would have to be filled in.

And indeed it was with a rectangle of thin .010 plasticard; and a square of plastruct ladder that had been thinned down a little was attached to the top of this to 'lift' the new panto off the roof a little as the real one is. My structure isn't entirely prototypical but I think it will look fine when the etched panto is glued on top.


Then I decided to bite the bullet and paint the roof silver - a risky endeavor that could end very messily, but with the aid of my magnifying light and a very subtle demarcation line that exists on the shell, it wasn't as hard as I had feared (although in these harsh closeups it looks like I need to touch up one bit that I didn't notice with the naked eye):

Per the prototype, you'll see that the larger grilles were left the Marklin gray colour while the center one was silvered up.


In the above pic you may note some thinned black added to those end grilles and in various shades to the roof as the first step in the weathering process. There seems to be a distinctive pattern to the Re 4/4 tops, with the dark panto-droppings down the centre, and often a little rust on the sides of the cab roof. The locos must be cleaned fairly regularly, as other than the tops of the roof and some occasional fading of the red, most 4/4s I saw at the time were in reasonable nick.

After this pic was taken, some dullcote was sprayed on and chalks applied to make the effect more subtle. More on that tomorrow.

Friday, November 1, 2019

Marklin's Re 4/4 - Improving the looks - 3 - Pantographs

The very day I received my Re 4/4s, a plan was hatched to replace the big ugly Marklin pantographs with finer, non-functional, etched examples.

Sure, etched ones won't go up and down and they won't collect current, but... I don't need them to. I just need them to look better.

As can be seen here, the real things seem almost invisible:


A tad finer and more petite than the model below. Note that the big current collection shoe is almost the full width on the model compared to the proto:


To be fair, the Marklin panto had to be engineered sturdily-enough to operate up and down consistently over a long period of time in the gritty and dirty hard knocks world of model railways; and be wide enough to collect current over the imperfect, tight, wobbly track and catenary setups that are possible on Z scale layouts. Although I'd wager that only a handful of people actually use the overhead current-collection option on marklin layouts. Indeed reading between the lines on a recent Marklin release makes me wonder if they may drop this option in future.


But be that as it may... the plan was to etch some replacements, and the above was drawn in Sketchup eons ago based on a closeup crop of one of my pics:


And after several years of sitting on this, I finally got a mate who is good at this sort of thing to set it up and get a prototype etched in Phosphor Bronze for me by PPD in Scotland. This material is stronger than brass and should be able to take the inevitable bumps and knocks better.


Well, don't those look fine and dandy?  I don't own any 'Blacken-it' chemical etch or gun blue, so applied a low-tech Sharpie black marker pen to them instead before getting out the pliers.


Folded up:

It took about 5 minutes of prodding with pliers, tweezers and confused looks to do this one, so I will refine my technique as I become more familiar with them, which will result in a 'neater' appearance as I had to bend and rebend a few things.

 The phosphor bronze is certainly much more forgiving than brass, and much stronger indeed. You may notice that I folded the lower support strut the wrong way too...


It certainly looks a bit more scale than the old ones... More fiddling will follow.

Thursday, October 31, 2019

Marklin's Re 4/4 - Improving the looks - 2 - Pilot/coupler

The next obvious thing to tackle on the Re 4/4 is the couplers situation...


Now I'm actually OK with the big, horny, clunky, Marklin coupler in general. It may not be pretty, but it does the job. Changing them all to Microtrains would be a big time-suck and an expense for little improvement in looks and no improvement in functionality - indeed they'd probably be less-reliable with my luck. 

As for their clunky aesthetics, I don't actually think people will be peering up close between the wagons on a layout like Wassen, so the only horrible Marklin coupler that it really makes sense to fret about is the one at the front of the train, as that is where most people look.

Obviously I don't need a coupler at the front of a lead loco, as I'm not running around trains or doing complex bidirectional shunting moves (I doubt many people are in Z scale...)  But most of my trains are double-headed, so some locos need couplers at both ends.

So the plan is to remove the coupler from one end of a few of my locos and replace it with the 'pilot/headstock/cowcatcher' at that end.

If this was done cleverly, the pilot would be attached to the chassis rather than the bodyshell. This would allow shells to be swapped out so that, for example, my blue SBB Cargo 4/4 might sometimes be seen in the lead and might sometimes be the second engine.

So one of the bogies was detached from the chassis and it's coupler removed. Some of the cast-on pilots and a little extra plastic was removed from the front corners of the bogie to provide more clearance between the bogie and my new pilot while swiveling. You can see the angled pilot faces carefully glued to two rectangles of styrene in the corners of the chassis below.


This means there are no issues with bogie clearance, but if there is a collision, the thing is going to come adrift. Perhaps some tiny screws in the corners (or even some brass rod) through the chassis and into these blocks might make things more likely to survive future altercations.

The curved corner pieces being made up from styrene pipe:


And attached in this blurry pic:


A few bits of (grossly oversize) brass wire later:


Hardly dramatic, but it looks a little better closeup. Next time the detailing might be a little finer...


Marklin's Re 4/4 - Improving the looks - 1 - Inside

As you may have noticed, I tend to model at a million miles or an hour or at zero.

The ETR 610 has made some progress, but it hasn't been a tsunami of progress that keeps me motivated. It has instead moved very much from one stumbling point to the next.

So in the hopes of restarting in Z for a short while, I have had a number of ideas on the back burner to improve the looks of some of my locos.

Let's start with the Re 4/4. For Z scale, this really is a superb model that is crisp, well-detailed, well-painted, and most importantly, conveys the look of the original with only a few compromises to fit with the Marklin 'system'.


Two main things stand out as needing improvement:

  1. The massive silver pantographs - these look better in the factory dark chrome on my BLS locos but I expect one could do better...
  2. The massive coupler sticking out the front.
In addition there are a few quick and easy cosmetic things that could also be tried.  For example, Zettzeit.ch has some 'machine room' interiors that you can print out and install behind the three large side windows.


You print this out so that it is 35mm wide (I stuck a few together in Photoshop first to print off a bunch in bulk) and ... there you have it. 

The jury is still out as to whether I like these or not. Might have to try a few that are darker ( I may have lightened them a bit much in photoshop).