Can the superb new Marklin Re 6/6 be improved? Of course!
The chunky pantographs were quickly unscrewed and disposed of.
Looking at my pictures of Re 6/6s, the roof seems fairly silvery where it meets the red sides, and then usually dirties up on the top, especially around the pantographs. I assume they stay cleanish on the sides due to the train washing facilities. So the grey roof on the model was painted silver, except for the bits between the pantographs - because I knew I'd be making them dirty soon.
Some brown Tamiya panel line accent was dabbed onto the roof's side grilles as I've seen a few pictures of these looking lightly rusty, and I thought that might be something different to do in terms of looks. In hindsight I'm not sure I'm crazy about this and will probably go back over them with black accent.
Various shades of grey, dark grey and black then found their way onto the roof.
The aerials above the drivers cab (radio and GPS I assume) were painted very light grey. Nice that Marklin included these, and the UIC plug (?) between the front windows is already white. I put some Tamiya Smoke inside the side windows to darken them down a little.
You probably can't see it in the pictures, but I also added tiny red vertical strips between the main front silver window frames and the curved corner windows. I did the same on the Re 4/4.
As mentioned yesterday, the little side details between the bogies (air tanks and boxes) were very lightly glued in with come contact adhesive, as were the cowcatchers. I note that there is an ETCS shoe cast into one each of the side details between the bogies - attention to detail! The lower half of the bogies and those details were washed with a little brown. Most of the 4/4s and 6/6s seem to actually have grey weathering on the bogies - perhaps from use of sand on the way up and composite brake blocks that don't produce as much rusty-dust on the way down??
A little bit of this brown and grey ended up on the sides of the loco. As I have a second 6/6 on the way, I figure this one can be the 'second loco' behind an Re 4/4, and the other 6/6 will 'lead' a train with a 4/4 behind it. As such, I decided I would gunk this up a little more and add a little more detail (including a front cowcather/pilot) to the leader.
As with my 4/4s, it will be nigh impossible for me to change the side numbers and town lettering, but I could change the crest on the side. I was looking for a yellow one, but then found this number, ten less than 11666. Pic below from Christoph Herni on Flickr. I did attempt to change the numbers on one side with a blob of red to change the 6 into a 5. Not worth it! I painted blue inside the crest frame, and put three angled white lines across it.
After I'd done most of this, I added a set of etched pantographs.
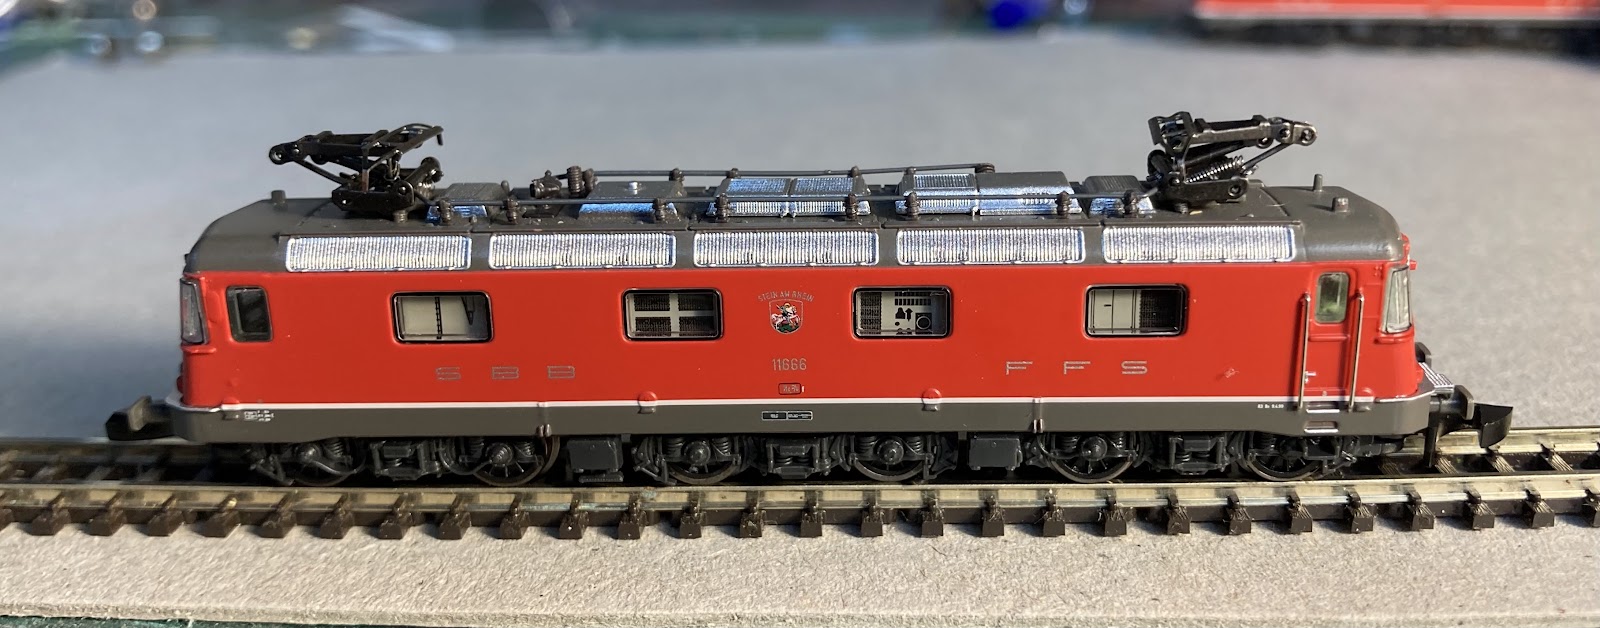
So here is a closer pic:
And as it looked yesterday:
I'll probably revisit this again tomorrow and clean up a few areas.
Other things I might add to the 'lead' 6/6, once it gets here, include side mirrors, maybe a front step, that door behind the cab on one side, the little white triangle on the cab side doors, maybe some sun shades ...and a driver!
It's been a long wait for the Marklin Re 6/6 (announced more than two years ago), and for me, it's been an expensive exercise.
I feared I'd missed out when the one ordered at the NZ dealer came back as "item on backorder', so I ordered a second one from Z Scale Hobo. Plus a '175th' SBB livery Re 4/4 with a can motor, as I'd heard the new can motor locos don't run well with the old 5 pole cage motors. Plus a few new wagons with both locos. I'd better get a lotto ticket to pay for all of this.
So. A new design of white Marklin card box, and out pops Re 6/6 11666 “Stein am Rhein”, Marklin's item number is 88240.
It looks fabulous. The Re 4/4 was a superb model (except for the pantographs as have been mentioned in the past), but this is at another level. Freestanding handrails,tidy roof detail, detachable front skirt/cowcatcher/snowplows, and most importantly, this is the first of my Marklin Z locos where the chassis 'looks right'. Large diameter, nicely spoked wheels, a prototypically spaced wheelbase so the body doesn't overhang much at the ends, and most importantly, the body is hunkered down on the chassis in a way the Re 4/4 could benefit from. Not bad at all.
The pantographs, while still clunky, are painted black, which reduces their visual impact a little. I believe this is one of the first Marklin locos that doesn't take current from the overhead, which might upset some people with existing layouts (it doesn’t bother me). Given this, why not provide some fine injection moulded plastic ones in the box? One folded up, one down (and several spares of each to allow for breakages!) I'll be replacing mine with etched examples.
Compare the 6/6 and 4/4 bogies/trucks/drehgestell). On the real thing these are almost identical.
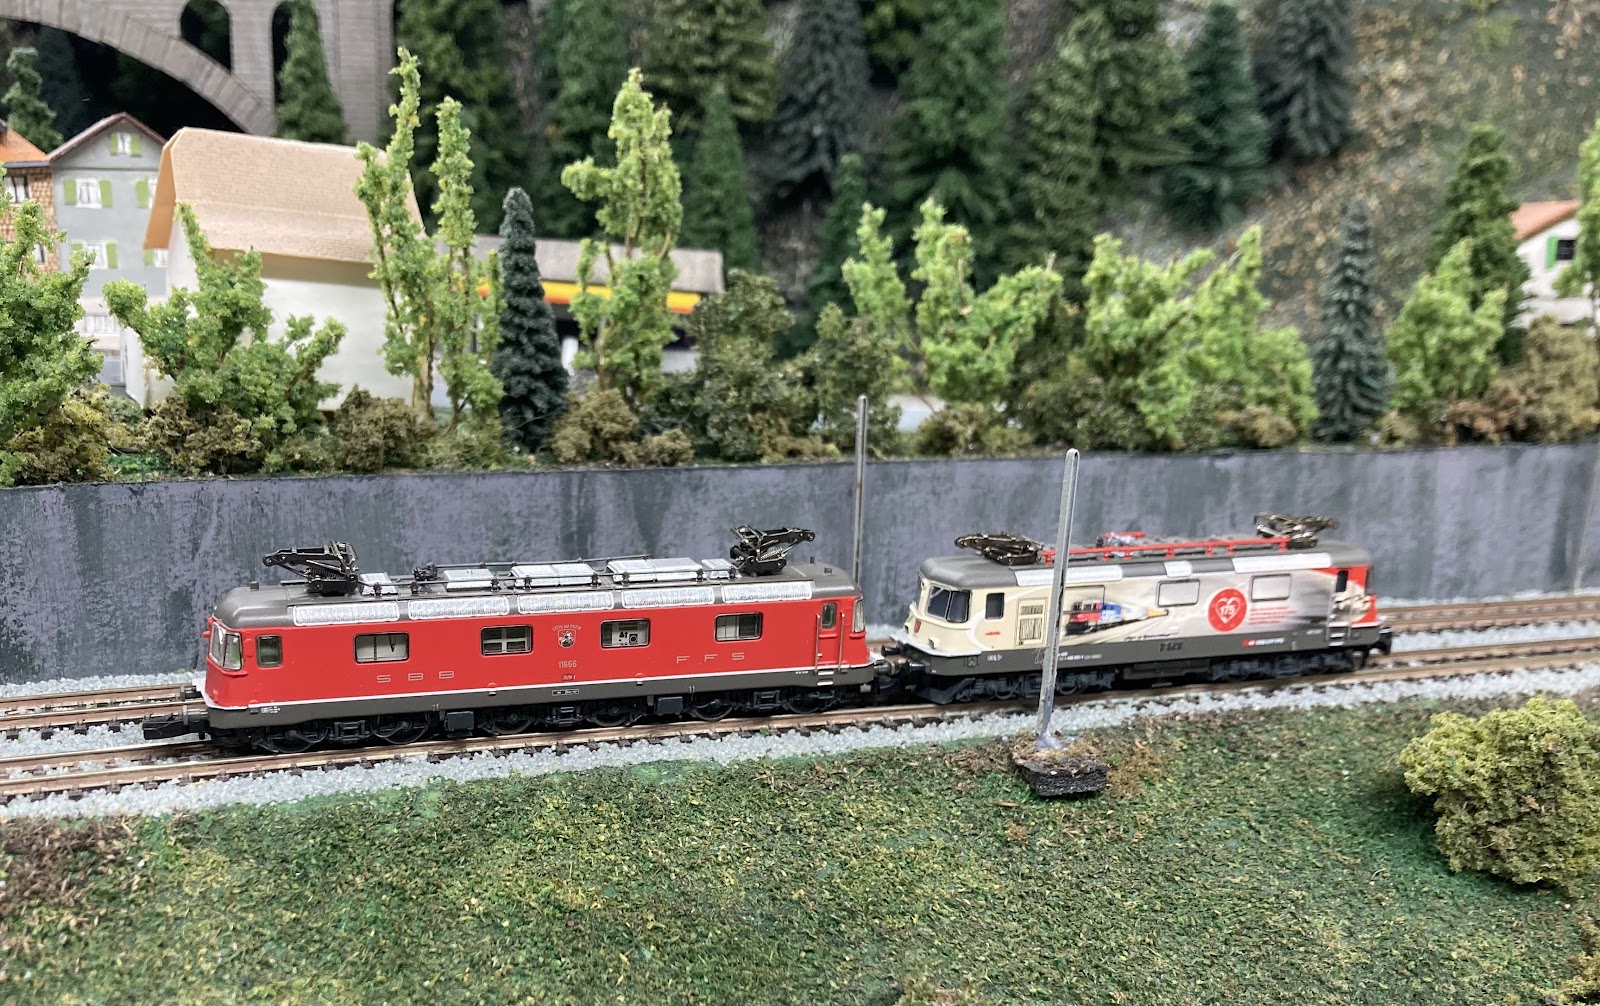
A proper Re 10/10!
Popping the top off, the innards look quite different to the 4/4s (even the new can motor-equipped 4/4). The body seems to be cast in a lightweight light coloured metal (? but it feels a bit like plastic). The pickups from the two end bogies are thin wires. I'm not sure if that is a good thing (no rubbing copper strips to get dirty) or merely something that can break. There is now a long circuit board on top. The little air tanks and boxes between the bogies clip in and out (and surprise you by pinging onto the floor the first time you take the shell off). I'll probably glue them to the chassis. The printed boxes and things on the side of the light grey chassis can be seen through the side windows to provide some interior detail, which is a nice tough, and there is cab interior at both ends. Again a nice touch, but that leaves little room for extra weight.
As god intended:
So how does it run? This is the first Marklin loco I have with the new ‘bell armature can motor'. It’s quieter and smoother than the old motors, but not as smooth or quiet as the Rokuhan unit I have. It was also reported to be a bit faster than the old motors - why didn’t they change the gearing so it would run with the old 4/4?! Grrrr. Then I further bolstered Marklin's coffers (voting with my wallet for poor decisions) by buying the 175th livery Re 4/4 which also has a can motor. Despite the top being of no use to me as that livery came out in 2022, after the Gotthard base tunnel opened.
Side by side, the two can motor locos run at different speeds anyway, the 4/4 a little faster, although they run together OK.
I'd also read a review saying the 6/6 was a bit light and wimpy, but I ran th 6 wagon boxcar train with no hassle behind the 10/10. The 620 was a bit jerky in places. I was surprised. It's a brand new loco, so it should be clean, and I cleaned all my track. Almost as if it was losing contact with the rails in spots (wonder if there is enough vertical movement in that middle bogie) and it felt like it got 'tired' the more I ran it!Maybe I just need to re-clean a few spots on the track. It certainly wouldn't hurt either of these locos to have a bit more weight.
So the 10/10 ran well enough other than the occasional herkey-jerky, but with two locos they tended to get past any bad spots. I swapped out the red and cream 175th livery top for one of my red tops for the video.
This first "running session" on Wassen in many years was a mixed bag. One of the levels of loops in the north end hill is too close to the scenery and the Transwagons (and other long wagons from the marks on the inside) scrape inside the paper mache, and on one occasion, they caught and derailed the train. Good to know, as I'm sure that can be fixed.
I then noticed that the new 6/6 ran at a similar speed to the old-motored 4/4s (Grrr!!!) so ran a big container train behind them, which ran reasonably well given its length. One container wagon caused a derailment by clipping a plastic tunnel portal (which was then opened up slightly with a knife blade). I also need to add more vertical clearance on the north loop somehow, as my nice pantographs were getting snagged. The points up top of the south hill seem a bit sketchy in terms of power delivery, which is a pain, but two locos will generally power through them.
With the long train of light wagons and little wheel flanges, sudden stops and starts cause derailments. As does backing the train for photo ops. So the session was a bit frustrating. I need to sort out some of these issues or the layout will just be an exercise in frustration. Fortunately, now that I've identified a few trouble spots, they can be fixed.
A few videos might show up if blogger gets around to processing them:
Today I stuck on my blue laser printed Samskip container sides and roof from the large sheet of container sides I had printed by a print shop up a long time ago. Some of the sides were pictures of mine and others that I perspective-corrected in photoshop, and some were blatantly stolen from the internet. Something I don't approve of, but at least this is not for any commercial purpose.
As mentioned last time, it's lucky I painted the container ends blue because I forgot my master plan and joined the two halves together before sticking the printed container ends on - In the end I didn't use any printed bits on any of the container 'ends', relying on the blue paint. The printed pieces are on the sides and roofs.
Overall the wagon looks "OK but not great", maybe a 6 or 7 out of 10.
The thing that irks me about the wagon is that I've made the drop-sides a hair shallower than the plan, and coupled with the tall bogies, the whole thing looks like it sits a little high off the rails. This is something that annoys me about many of the the Marklin wagons, and that I have tried to overcome in most of my previous intermodal efforts... yet seem to have failed to notice here until everything was all but finished. It's quite noticeable against the 2x40-footer next to it in the picture above, although the sides are probably a little deep on this one!
Is this fixable? I suppose I could build new deeper drop-sides, but that seems like a lot of rework, so will likely write it off as a lesson learned. When embedded in the train I suppose it doesn't look so bad. I suppose I could also remove the bogies and the brass articulation assembly and mount them further up inside the wagon. This might be more palatable. We shall see
Now I have 11 or 12 intermodal 'wagons' (counting the articulateds as two). Another two or three would make a decent length intermodal train that would suit the layout. Unfortunately my locomotives won't be able to pull a train of that length up the hill anyway!
Here is my prototype pic for comparison. Maybe with some weathering the high-riding sides will be less noticeable.
This evening I spent an hour or two putting some detail onto the 'wagon sides'. I figured I'd do the same as on the 2x40-footer, so started by putting twistlocks in the corners. D'oh, on 45-foot containers, the twistlocks are inset at the 40-foot mark so that both container sizes can use the same set of twistlocks on a wagon. I should have known that... Rather than rip them off, I just added some extras in the correct places. These were little cubes cut from .030x.030 inch Evergreen styrene rod.
Some vertical strengthening ribs were added to the deep part of the sides with .010x.020 rod as I had done with the 2x40-footer, which is a lot easier than it looks.
I cut a dozen or more little lengths of the rod oversize and put a tiny puddle of styrene glue on something (like waxed paper).
Pick up a little length of rod by the end using tweezers (gently so so it doesn't ping onto the floor).
Twist it if necessary so you are holding the rod in the right orientation (I had them so the ribs stick out a wee way(.020) and look skinny from the side (.010)
Coat most of a long edge in the glue by dabbing it in the puddle. Avoid getting any glue on the tweezers or the rod will stick to them instead of to the wagon side.
Put it in place. If there is not enough glue, you may need to re-dab the rod in the puddle again.
Adjust it to be vertical (my built-in 90 degree protractor seems to get less and less accurate each year) and parallel to its neighbours. I decided to to a pair of these ribs at the ends of the drop down and one in the centre - there are loads of different makers and styles of these wagons so this is just "close enough to give the impression of detail." In the real world these are usually placed below the various sets of twistlocks.
After they have set, put the outside of the wagon down onto something like a block of wood and trim all the excess pieces of the ribs to be the same length as the sides with a sharp knife.
A base piece along the bottom of these sides was added for strength and looks. I should have continued this up the angled parts as well, but decided it wasn't really necessary. And I was feeling lazy. A few other bits were added over the bolsters, and then a touch of grey paint added.
A little blue was dribbled onto the ends and corners of the containers as an experiment. As you will see in the next edition, I'm glad I did this. The 'easy' end bogies also got attached at some stage.
A long time ago, in a galaxy far, far away, I made a nifty articulated pair of 40-foot wagons - (sggrss part 1 , part 2 and part 3). I can't believe that was more than six years ago!
A 40-foot set was built because I had some nice 40-foot American Z Lines (AZL) containers on hand, but I never actually saw 40-foot articulated platforms on the Gotthard, they all seemed to be 45-foot pairs. In the alphabet soup that is European wagon classification, these may be called "sggmrss 90." Here is a picture of one I took at Wattinger a long time ago.
So it seems logical to finally make one of these. Once again, the containers will provide most of the structural strength here, so I began this saga some time ago by (badly) sawing a pair of 40 foot containers in half. I think these came from MicroTrains Z scale American doublestack wagons. They were then stuck back together with some styrene rod inside in an expanded position so they were 45 feet long.
A start was then made on the wagon sides, which will hang under the containers. As I don't have much .040x.040 inch styrene strip left, I used skinny .010x.040 for the long top pieces (and will probably regret that later). The 'drop' parts of the sides were made from .010 x .080 using the plan as a guide for cutting the angles.
I started marking the 'inboard' angles with a fine black marker (as above) on the cut pieces before I realised the inboard and outboard angles were the same, so it didn't matter which end was which!
The drop sides were attached to the thin, long underframe pieces with some backing styrene. Of course it does matter which end is which here, as the drop sides are not centred, but located towards the middle of the articulated wagon to clear two axles on the outer ends but only one with the shard bogie in the middle if that makes sense. It goes without saying that I accidentally made three of one side and one of the other! Fortunately I had cut enough pieces for 8 sides (with a plan to make two wagons before I hit on a smarter way to make these).
Then it was time to attack the bogies, or drehgestell if you prefer. These came from my weird-looking Marklin 82434 Schauffele dump cars that were purchased for their Y25 bogies because they were the least costly wagons available at the time.
The two end bogies are easy to install with their attached frames, but the center bogie has to be popped off and have its mushroom-shaped mounting pin and the coupler removed. Note that the inboard face of the coupler remains, as this helps hold the wheel in.
Then it was carefully drilled for the brass screw (as the bogie is made from that tough, shiny plastic: carefully). Two articulating brass pieces were then prepared which will be attached under the containers. Although plastic washers (from N scale Microtrains bogies) will be used to separate the bogie away from the brass strips, I shape the lower one to make sure there is no chance the brass will impede the turning of the bogie or cause an electrical short if the wheel flanges touch it.
This lower piece of brass has been shaped with a file in the picture above. Hardly a work of art, but nobody should ever see it again. A brass screw is used so it can be soldered to the top piece of brass, which has been prepared in the picture below.
Two Microtrains washers were used (rather than one visible here).
All soldered up. Carefully! The top of the screw was then cut off with a Dremel, taking pauses to prevent everything getting to hot. The whole assembly swivels as it should. Its a little tighter than the 40-foot model, but there seems to be enough play.
Not much to report this week, other than filling the spot between the service station and the rest of the town with a tiny version of the pinky/red house that lives in the real Wassen.
This is a small space, so the house was and simplified (a lot) and shrunk (a lot) to fit. I probably made it a little bit too small, but the important thing is that it fills the space and more or less completes that quarter of the town.
I'm torn between building another building next or a new wagon...
Today I had a crack at the petrol station alluded to in the previous post, and to my surprise had it glued down within two hours.
The real thing has a wooden upper floor on a concrete block lower, with an angled extension out front that I declined to model, out of both laziness and a lack of space.
For the top half I used some grossly overscale but decent looking faller card sheet, with an overlay of roof-slate-printed Faller card for the bottom concrete blocks. The black bits are for the big windows downstairs.
And overlaid:
The 'concrete block' bits were overpainted beforehand with a light grey so the detail would still show through, and the roof later painted darker, as these were made from the same card material.
As usual, its all a bit hokey and out-of-square, but it looks OK from a distance. The canopy sides were painted yellow and some red decal stripes added. I considered putting 'Shell' and Mattli' signs up, but I doubt they would want to be associated with such a crooked model.
Under the canopy are some white pieces of wire poked into the foamboard road and a few bits of plastic rod for petrol pumps. If I wasn't so lazy I would have put some red and yellow on them before sticking them down.