Thursday, April 30, 2020

Another grey SGNSS container wagon - with a flat rack - 2

Now for Part 2 of this wagon story... 
Containers on and ready for detailing.

In the pic below you can see cubes of .020 x .020 styrene in place on one side as twistlocks, and more of them on the green mat below ready to be applied on the other side, affixed with superglue. Also you can see the long strips of .010 x .020 that will be applied along the bottom of the frame, below the twistlocks. This was glued on with a little PVA white glue to get things into place and then some superglue once things started to tack up in place.

Above the bogies, there is a short strip where the tiedown hooks will go.

Now that the sides are done and setting, a few bits were applied to the unders - air tanks and a box of sorts. 


 The tiedown hooks and data panels were liberated from the red curtaintop. They are imprisoned in a small plastic box to prevent them pinging off into the ether:

And carefully applied using the magnifying light - which I have to use a lot more these days since rocking across the big 5-0 hurdle.....

All painted up with grey and yellow dotted on:
The angled brass things (made from .008 brass wire) are the protectors that go across the tiedowns.

And a little touching up and weathering later (brown wash on the sills, brown drybrushed bogies, a little chalk on the container):

Three grey ones:

So that was two hours today and two hours yesterday for a new wagon... not a bad way to spend four hours of Covid-lockdown-time.

Wednesday, April 29, 2020

Another grey SGNSS container wagon - with a flat rack - 1


Well I think they're called SGNSS wagons. When it comes to modern European wagons, there seem to be many, many, many class variations with an alphabet soup of letter combinations. Each letter means something with respect to length, loading gauge, capacity and so forth... so if you know the UIC codes, you know that this wagon is for your application. All I remember is that S usually means some sort of bogie flat or covered-flat wagon.

But I digress... this time I'll try to remember to take some pictures.

I started with that black Marklin chassis from last time, extracted from under one of these red sliding covered wagons as above.

Popped the bogies off and got filing with my fairly primitive file - by hand and with no vice since were still in covid-lockdown here and my vice is at the other end of town... I'm not sure that would be an 'essential journey'.

No matter, it didn't take as long as I remembered. Incidentally I found the Dremel useless for this task, but may have been using the wrong grindy-thing.

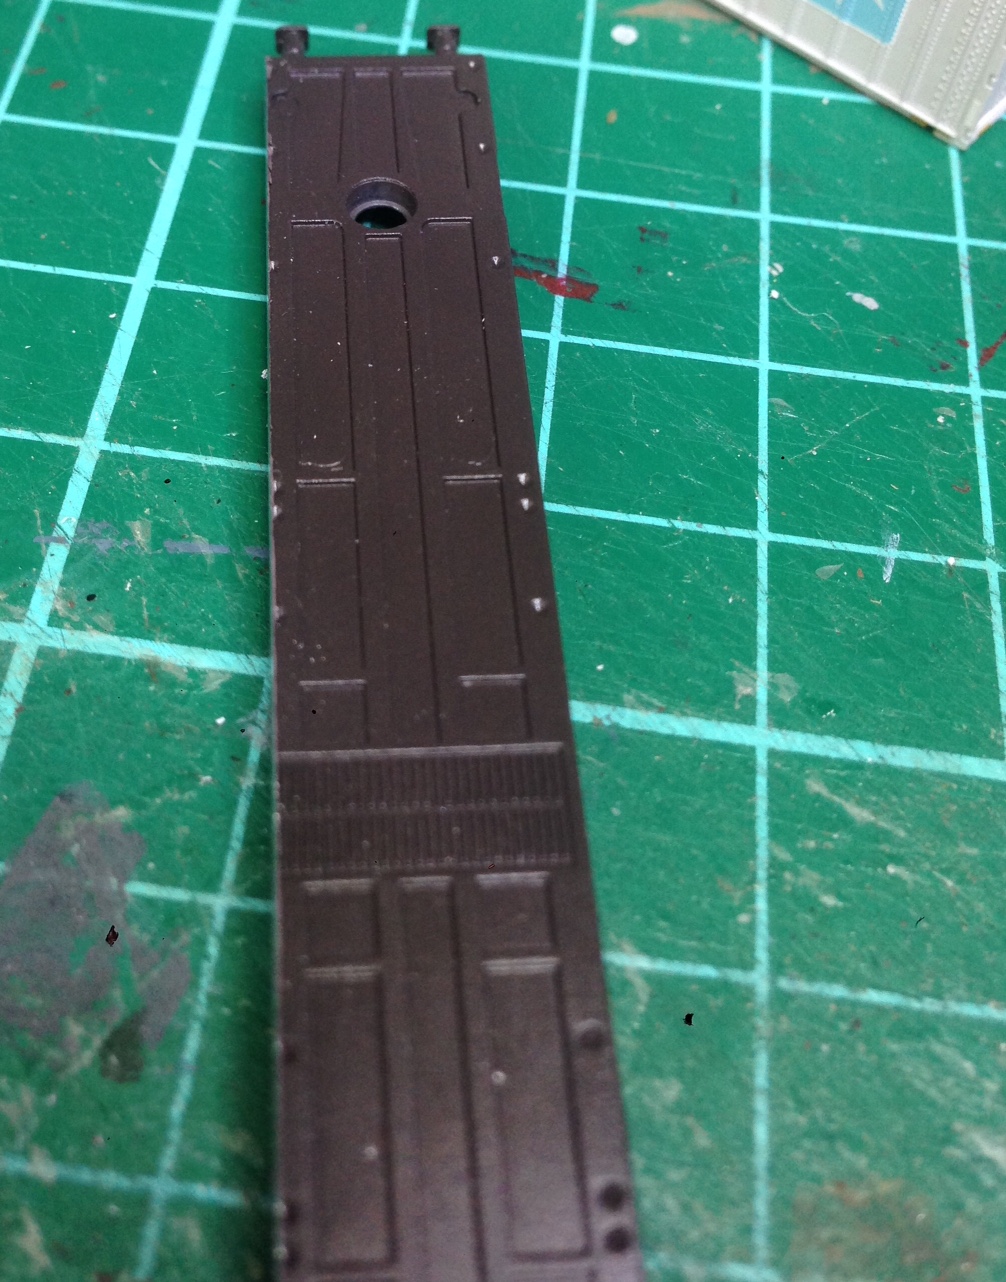
As with last time, I filed down the sides until I was into the 'twist lock dimples' cast into the wagon top (those with good eyes might can see the left edge has been thinned inwards in the image above).

As these wagons are 60 feet long, and I still have a few 40 foot containers ex AZL and Microtrains US doublestack cars, a cunning plan was hatched to do something different at the 20-foot end this time and build a 20 foot collapsable 'flat rack' open container to fill it. Something like this, as stolen from the World Wide Image Repository:

In the image below you can see this starting to take shape at the top of the pic.

The black 20-foot base is half of the ribbed bottom insert from the grey 40-foot Maersk container, and the ends are squares cut out of Plastruct ribbed sheet from my plastic bag full of plastic bits. I faced the ribbed side of the sheet ''inwards' as they will be seen more easily from inside the wagon. One outside face of the flatpack ends can remain plain, as it will be hidden by the 40-footer, the other plain end will be exposed at the end of the wagon so I scribed 7 vertical lines into it as can be seen in the pic. You might squint and see that one of my lines went off into the wilderness so I smoothed it down and hope the paint will hide it enough.

As can be seen above, the 'ends' of the 40 foot container were once again cut away at the bottom (or the top side here as it's upside down in that pic) to allow the container sides to hang down over the Marklin flat car chassis. The metal chassis is too thick to perch containers on top of convincingly,  so this makes the wagon look thinner and the containers look like they are sitting much closer to the rails. The flat rack will be built with sides that hang down as well for the same effect.

Once the wagon had been thinned enough to fit snugly between the container sides, it was primed and set aside. Otherwise I would have finished the wagon today!


The flat rack was supposed to be a quick and dirty job but it started to look reasonably decent, so I perched some twist lock housings on the top corners and used I-beam Plastruct with one edge filed down (to turn it into a tall C-channel) as the sides - the bit that hangs down over the thinned wagon chassis.


Some miscellaneous details and ribs were added into that C-channel and the whole thing was painted with a made-up shade of blue and weathered with washes and dry-brushed browns and greys.

To represent a load,  Plastruct round rod about 3mm in diameter was painted brown to represent pipes, cut into 2cm lengths, and these were carefully stacked and glued with dots of white PVA onto four short cross-pieces of stained stripwood.

This can be seen under construction above. The icing on the tiny cake was provided by some stripped electrical wire, which revealed many strands of very fine wire. I grabbed two of these and twisted them up into a silver rope. This can be seen in the bottom-right corner above.

Two of these ropes were wound around the load and twisted together underneath. The whole shebang was glued down to the blue flat rack.

Rust-coloured weathering chalks were splotched on the pipes for effect.


She's looking good, Vern.

Monday, April 27, 2020

Finishing that grey container wagon - part 2

Following on from last time, my original plan was to clip the silver container onto the wagon  (its overhanging sides grip the side of the container wagon well) and use the bottom of the container as a guide to apply the twistlock squares tight up under it. Then I could take the container off and paint everything neatly. 

Some .030 square plastic rod was cut into cubes for the twistlocks and applied with some PVA-ish glue but this wasn't going well, and the twistlocks looked too big.

So I popped the container off, removed the twistlocks, and glued the containers on permanently. Then went with .020 rod for twistlocks, superglued on. These looked much better.

A strip of .020 x .010 was applied to represent the under-rib on the side sill. 

This is what the wagon looked like after those mis-steps were re-steppped:


This all happened pretty quickly and some paint was lashed on - it turned out to be easy enough to paint the wagon sides grey without getting any on the containers. 
 In the above pic you can also see a brakewheel on each side (stolen from some less-attractive Marklin coal cars) and tiedown hooks (above the bogie bolsters) from the original red curtain car that donated its chassis for this project. On previous wagons, I've stuck the tiedown hooks 'out' a bit further and like this look much better. The protective bars around them have not been applied in this picture.

On the underframe, there is an airtank, a miscellaneous 'box', and the wagon data board stolen from the red cutrain-top.

The tiedown hooks, twistlocks and brakewheel rims were picked out in yellow, the buffers painted black, and the brown undersides painted dark gray except for the angled bits which are grey. The data board had a wash of dark grey added to try to remove some of the brown while hoping to retain the white printed wagon data.

In faked-up-action:


And finished with the protective bars around the tiedowns picked out in yellow, plus some weathering attached - a browny wash on the grey wagon to accentuate the sills and some brown and dark chalks on the containers. I accidentally blobbed some yellow paint on this side of my tanktainer, so had to cover that up with white paint (near the G in Den Hartogh). Whoops.

Overall I'm really pleased with how this turned out, and will make another one soon.

Thursday, April 23, 2020

Another Grey Container Wagon

Just for something different.... I'm building something other than a building.

One of my favourite Z scale wagons is this semi-scratchbuilt SGNSS container wagon. You can see how it was built by viewing the three preceding posts in the blog as well. It looks quite decent really, fairly 'fine' and 'scale' looking, although the side knobs that the tiedown hooks are attached to are a little oversize.

That, and another crappier wagon, were built using the plastic guts of a bogie wagon halved and stuffed up into containers that are glued together to form the real structure of the wagon. The visible sides of the wagon chassis are just for looks.

Another alternative to this approach is to use what Marklin uses for its rudimentary container wagons: the 'long flat chassis' that sits under a lot of their Z wagon models.

I happen to have ended up with more 'red long curtain wagons' and those RES stake wagons. I quite like them but have more than were needed. But if you pop the tops off.... voila - the chassis becomes Marklin's container wagon. I've used two of these already - one as  a fairly chunky container wagon and another as a skeletal version.

The problem with using these (and the problem with Marklin's container wagon offering is that the deck is really too thick in height (so the flat top of the wagon sits too high off the rails) and too wide - often sticking out wider than the containers themselves (depending which Z scale containers you have purchased! ISO I don't think so). Prototypically the wagon should be thinner than the container so the twistlocks, which sit out proud from the wagon frame, fit into the container's corner ISO twistlock holes. I.e. the twistlocks should be the width of the container, not the wagon.

So to remedy this, I need to thin the metal deck down and then hope to hang the containers over the sides to remedy both issues.

After some quizzical expressions were released over how they are attached, it turns out that the bogies just pop off.


Interestingly one has a massive amount of casting flash on one side. That might impair running qualities. It was hard to see this, so I outlined it in blue here in Photoshop. Only on one side, and only on one bogie. The pic was taken while applying a wash of brown weathering to the frames....


The frame that I have thinned is the brown one below and has been thinned out by rubbing the edge on a coarse file.  The donor red plastic shell is also shown, the black chassis is an untouched one, and the brown one is the one that I have thinned.

And upside down... In the pic above the little dimples (I suppose representing in-deck twistlock holes) it might just be visible in the above pic. I filed down to these holes enough so that my container sides are wider than the thinned wagon.


That didn't take as long as I'd feared... I painted the wagon edges with a grey primer - I will eventually finish the wagon in grey like the first one linked on this page.

I have also started to prepare some containers. I think the Mitsui was from an AZL US stack train and the tanktainer was a Shapeways item.


You may be able to see that I have cut down the bottom of both ends of the silver container. This will allow the sides to hang down over the thick wagon frame - visually reducing its thickness and lowering the load so it seems to sit closer to the railhead. Unfortunately the tanktainer is a little skinnier so I have extended its edges lower (another strip of red plastruct square rod) and beveled the flat chassis in the hope of achieving the same effect. I painted the deck under the tanktainer a dark grey for now.

Tuesday, April 14, 2020

Yawn. More buildings

Well this is getting tedious, isn't it?

Nonetheless,  a new pair of buildings have sprouted in the last few days to go to the right of the Alte Post.

The Volg and turret building have also been tarted up slightly with some roof weathering and fascias. The Volg also got a few windows on the side facing the Alte Post just in case someone looks from over there, but alas the grey building didn't receive the same luxurious treatment.


As can be seen below, a start has been made on the huge building to the right of the pic below - I think perhaps an old hotel now an old folks home? At this rate we will have this side of town grown out in no time. Go the Coronavirus!  *

* said in jest of course...

Thursday, April 9, 2020

Mini-Gerig

My mini-Hotel Gerig progressed today. Its a little smaller and less windowy than the real one. I handpainted the hotel name.

 And of course I never remember to take these prototype pics that are on my laptop down to the trainroom, so build these largely from memory. This from Google Streetview:

Installed and barely visiblee. The three nearest buildings are just sitting there, but I have installed some (way-overscale) 'cobblestones' around, between and under them:
 Need some more of that road material. Its rather good.

Wednesday, April 8, 2020

One and a half more Wassen buildings

This is a house that is visible from afar that sits behind the corner turret-building (it probably has a nicer sounding name than that in real life) that was modeled last time. This is a foamboard core with thin card shutters glued on, windows drawn on, and a roof plonked on top. 

 And with a little paint:

It actually looks a bit like the real thing (although I declined to make the fancy roof dormer):

Later I added a base made of 'stone' for it to sit on.

Also, the little garage/stablehouse behind the Alte Post was added. And also visible here is the start of the Hotel Gerig that sits behind it:

Sunday, April 5, 2020

Two more buildings - Volg and the Corner Turret.

I've slowly pottered on and built two more buildings over the past few days.

In the real town of Wassen, between the Hotel Alte Post and the Sustenpass road there are a string of buildings. My feeble memory thought there was only one (the handy Volg supermarket where one could grab a banana and a bar of chocolate for the days railfanning and a small bottle of wine or Champers for the evening's piccy-processing) but it turns out there are a string of five of them.... The Alte Post is just to the right of the Volg with a walkway between them.


Such a  pain there is very limited Google Streetview in Wassen. I'd only left space on the layout for the Volg, or at a pinch one and a half buildings, but as there is this rather tasty building on the Sustenpass corner (below),  that deserves to be included:


And that would leave me room for about 60% of the Volg.

And so with much mucking about, the following has emerged. I thought the corner turret might look a little silly in white so I made it yellow to stand out a little. It's all built on a slope because the road outside is on a grade. Artists licence applies in other areas as well...


The turret was made from a Tamiya wooden paintbrush - they are longer than they need to be :)   and have no taper to their wooden shaft. I whacked off the end, stuck it in a drill and applied sandpaper until it conformed to the right shape at both ends. A tiny thin strip of card went around the top to represent rain spouting or somesuch, and more paper was applied to fill in the bigger-than-needed hole in the roof shingles. Just looking at the prototype pic, I need to add a spike on top of it.


As usual things are a little wonky and skonky in places, and they certainly looks far better from across a large room than up close, but it's passable on the layout.

(p.s. none of the buildings in the foreground have been glued down so they all have random leans to them.  Not that I expect that to improve wildly when they are stuck down !

My old iPhone takes a pic at street level...