Showing posts with label passenger train. Show all posts

Tuesday, June 11, 2019

RABe 503: Feet Examination

Some ups and downs on the plastic passenger train...

As for a chassis, you may recall the race was on between a well-discounted but still expensive Rokuhan Shinkansen three car set (one powered centre car and two dummy end cars) and some incredibly cost effective Rokuhan 'Shorty' chassis. I could have gotten a whole trainset of these for half the price of the Shinkansen set.


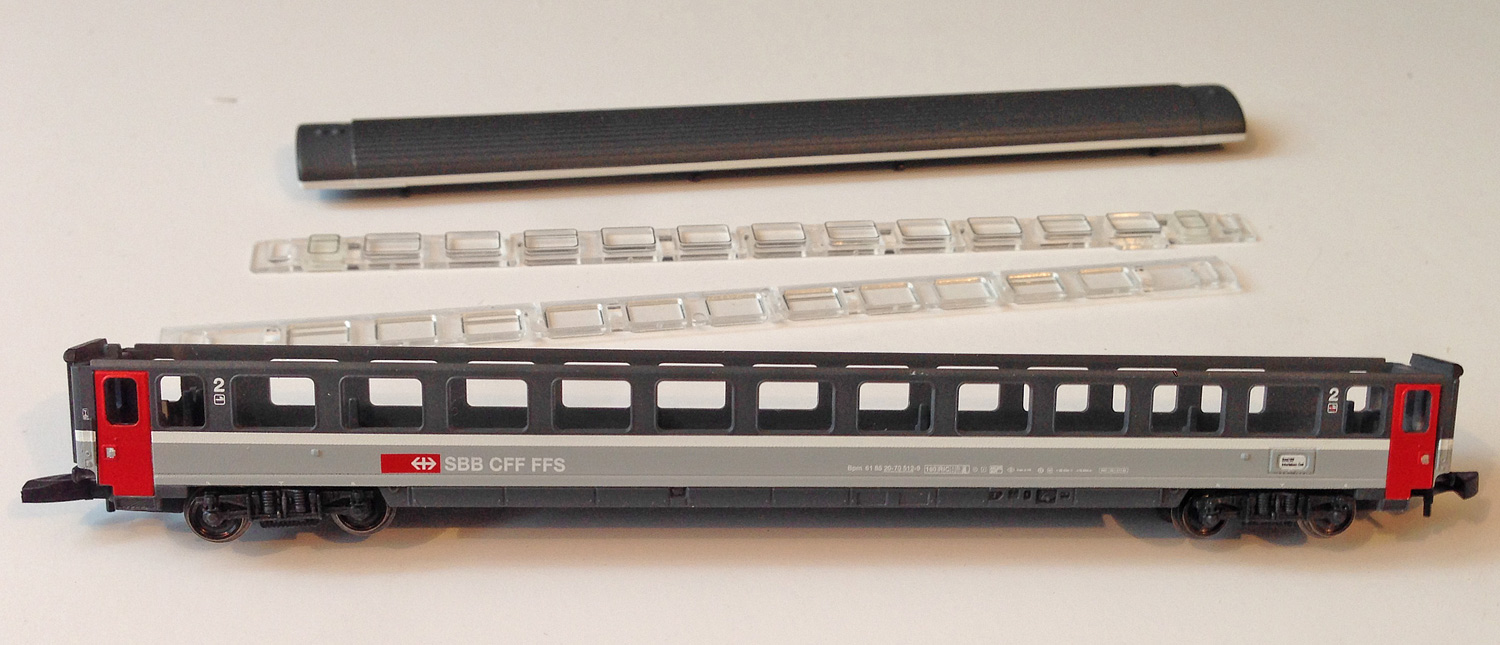
First things first. A dremel was applied to the 'tabs' that intrude into the interior space where I'll want to put a chassis later. These tabs are visible in the upper car in the pic below. The lower protrusions that are the doors and the bogie supports were also thinned out from the inside to give more interior space for a chassis.


As for the chassis race, it seemed that the Rokuhan Shinkansen may have been quite the expensive dead end as far as becoming the underguts of my fancy passenger train goes...

It's really, really wide, much wider than expected, and the bogies are too close together, again, also unexpected!


Even putting in a fair bit of of surgery thinning this down (as reassembled in today's first pic with the Shorty above), it's still a smidge wider than my carriage can take, but will fit with the carriage ends removed and the sides prised apart a little. That might be bearable in terms of width, and I suppose the Shapeways top could be shortened if those inboard bogies bother me - and they might not be so obvious in a 6 car passenger train in Z scale where all the other cars have their bogies positioned more correctly. Perhaps I'll get away with it, but I may need to shorten it anyway if I want to use those couplers.

The dummy cars will basically be scrapped except for their bogies. I could use the pickups and lighting setups, but I'm not sure I can be bothered putting the effort in at this stage - perhaps that is something to be returned to in future. 

The Shorties were probably the more sensible option in hindsight, although their coupler shanks are a bit short to be useful here as can be seen below. Perhaps they can be extended, or body mounted. Or replaced with something simple. 


In the meantime, some paint has been spilt on the Shapeways tops to varying effect.

Saturday, June 1, 2019

More on the old InterRegio cars...

Following on from the last exciting episode....

The Re 460 was tested, and somewhat unexpectedly, it runs smooth as. I'm impressed, and pleasantly surprised... Obviously it can't haul the whole expanded consist up the grades but I'm very pleased at how well it runs.

I painted over the '2000' logo on the front ends with my 'go-to' SBB red, which was picked up fairly randomly from a model shop in another city a year or so ago. Despite this, it's a perfect match for the Re 460 red straight out of the bottle.


It also seems that the 'chrome SBB directional arrows on the nose' are only appearing on refurbished Re 460s. This program is ongoing as I type this and very few locos had been completed when the Gotthard base tunnel opened, so that's a task I don't have to attempt for this one.

As for the 'old school' green-stripe passenger cars, after reviewing some pics, it was decided that the cream coloured sides on the Marklin models should be painted white. The green is also a little dark for my liking, but as often happens with photograph, in different light the real things seem close to the very dark green (almost black) on the models, so I can live with that. 


So I attempted to carefully paint white over the cream, starting with the roof stripe above the windows.


I wasn't crazy about how neatly this turned out, so for my second attempt, used strips cut from white decal paper over all bits except for the red-logo/SBB/CFF/FFS markings on the side.

Despite being very fiddly with tiny thin strips, with much cursing and rework it turned out ok - certainly good enough when viewed from the mandated distances in Z scale. In the blurry pic taken below you can see the comparison between the cream colour in the upper car (I've painted the end bits white and painted and decaled the roof stripe) and a fully decaled car below (taken before the large decal patches had set smooth). Close enough I reckon.


A final touch was the addition of the very thin black stripe along the white sides (something I had never noticed on the prototype until looking at these pics up close!), which was added with a .05 black pigment marker. This should have a gap with some lettering in it, but I just did the stripe and reckon that looks ok.


Monday, May 20, 2019

Something to see here - updating the passenger train

It feels good to be home again after a month away...

While on Europe's fair shores, I picked up six second-hand Z scale items; a few of which are hidden in this picture:


Firstly, I tracked down a red Re 460 to lead the passenger train at a reasonable price. These locos are all over the passenger trains in Switzerland, and while 99-point-something percent of them are red like this, Marklin has, for twenty years, focused on churning out the various 'advertising' paint schemes for collectors... but no updated 460.

The red ones are hard to find in Z, and Lokmuseum says this model (88441) was produced between 1996-98, so it is well over 20 years old, with the prehistoric (two versions ago) three-pole motor.

The model looks sharp though, and in very good external condition, but I don't even know if it runs. We will get to that in a future installment. It will also need to be updated slightly, as it has the '2000' marking and no SBB directional arrows on the nose.

Behind the 460 above, you might see SBB passenger cars with the old green stripes along the windows. Three were acquired - one will be repainted in the white scheme to match the rest of the cars prepared a while back.   Two will remain in this scheme (albeit slightly updated) as 'overflow' cars that were commonly tacked onto the InterRegio trains to increase the number of seats available during the high season. For example:

 
Interestingly, these older cars seem to roll better than some of my newer passenger cars. All were bought second-hand, and perhaps some have led more difficult lives than others!

Sunday, April 14, 2019

An ETR610/RABe 503 in Z scale? - 1

Of all the 'plastic' passenger trains over the Gotthard, I reckon the ETR600/ 610 / RABe 503 design shared by SBB and Trenitalia are the sexiest - far sleeker than the older ETR 470 and blobby RABDe500s.
Near Silenen
So imagine my surprise when I found them available on Shapeways.

Very nicely modeled (and well printed too, Mr Shapeways).  Until they release a clear plastic material for printing window inserts, I'd have made the windows filled-in, but this shouldn't be a drama as they are in a black panel anyway. Given the small scale, I'll probably pop a sandwich of black plastic and glazing behind the window openings.

As for power, this is yet to be determined based on testing, but the two contenders are: 
  • A Rohukan three-car Shinkansen - surprisingly, the middle car is powered and not the ends as expected
  • Three Rohukan 'shorty' power cars (the wee black one below). Given the low price of these, I figured they were unpowered trailers that I'd harvest bogies off for the other three cars, but it turns out they are powered...

The original plan was to use two powered Shinkansen cars and have the rest of the cars unpowered (but as I say, it turns out I only have one power car). 

Depending on how these types play together and how much power I need to get up my grades, I may use the Shinkansen on its own towing unpowered Shorties, or just the Shorties, or a mix on the train. 

The Shorties will be lengthened of course, and the Shinkansen sets (or the car shells above them) need to be adjusted a little too. The Shinkansen chassis is surprisingly wide too, so needs a bit of thinning. I had hoped to use the undersides as they are, as they came with some nice side skirt detail that looks about right, but they are two wide for the Shapeways tops.

I'll leave you in suspense for a few weeks here, as I am being forced to go to Europe for some more 'field research'.

Friday, November 4, 2016

InterRegio 4 - on the run

While I had the cars apart for their makeover, the opportunity was taken to trip or remove the buffers that I thought might have been upsetting the cars on tight curves and causing derailments.

Seems to have done some good, as I ran these around a bit yesterday with no problems whatsoever.


Are they perfect? No of course not - neither my painting nor the Marklin canvases underneath.

...But they do capture the 'essence' of an InterRegio train; and my modeling philosophy has always been that a 'close enough' model will always look better in a bigger scene, which allows me to steam through these things relatively quickly rather than seeking absolute perfection - or never finishing anything before losing interest.

One day I'll make some decals. I promise. In the interim, as far as I'm concerned, without my glasses on and squinting from the other side of the room: This train looks the shiznit.

Thursday, November 3, 2016

InterRegio - 3

Things proceeded at pace during a few short visits to the trainroom today.

The first class car came apart and was processed in a similar fashion to the two 2nd class cars. There were subtle differences - there are no end steps so the masking tape covering the unders didn't have much to hold on to and the 'gotcha' at the end being that the 4 pieces of 'glass' window inserts went back in a specific order and not in any other way.

The Marklin Panorama car is a bit different in its construction. Rather than the roof coming off, the body comes off the chassis on these, and the main curved glass pops out from the outside:
Despte this, it was tackled in a similar way to the other cars.

The roof grey had to come down a bit more than on the existing livery so I scored a line down to the appropriate distance with a knife and hand-painted down to it with a similar shade of custom mixed grey.

The red patches on the ends are a bit bigger on this car so my painting with the $2 paints ended up a little more lumpy. I also went mad and hand painted the yellow strip on top of the red that signifies first class on the prototype. This worked out considerably better than expected so the same was also applied to the first class car.
 All in all, the train looks rather decent I reckon:

The real heros have been the black marker covering up the silver window frames and the acrylic paints - especially the Tamiya White. These are touch-dry in minutes so you can be on to another colour in no time, so my attacking of this passenger train was reminiscent of a bull loose in the proverbial china shop.

Just as a reminder, this is what they looked like a few days ago.

InterRegio - 2

Continuing on from yesterday, a little red paint was splashed around the ends and the messy overspray cleaned up in dark grey  - both hand-painted using my 2$ set of lumpy artists paints purchased from The Warehouse or some similar dollar-store.

The raised silver window frames were then drawn over using a marker:


And after reassembly, things were looking pretty sweet. The two modified cars are at the right compared to a stock car at left:
You can compare these to the prototype at the head of this blog. Close enough that a galloping racehorse wouldn't notice.

And from the Scary Closeups Department, modified car are at right compared to a stock car at left:

I'm impressed with the deletion of the silver windowframes but do need to make up some "SBB CFF FFS" decals for the sides.


Tuesday, November 1, 2016

InterRegio - 1

As you may recall, I picked up an SBB passenger car set recently.

The set is a car or two short of what I would ideally like to see on the layout, although a single loco will probably struggle to pull more than four cars up the hill anyway, so that's moot...

Other than this, the main concerns with the cars are that:

  • they don't run that well 
  • they're in an older paint scheme

Hopefully that the former will be sorted out by my ongoing remedial trackwork tweaks and some adjustments to the unders - I have a feeling that the couplers are catching the buffers on sharp curves on at least one of the cars. Another car 'drags' a bit - as if a wheelset or two is rubbing on something.

The livery issue I'll tackle now - buoyed by the illusion of recent successes on the Habbiins wagons by the 51st Airborne Paint Application Corps.

So looking at the as-delivered models vs the real thing (as provided by the VGB Gotthard book), we can see that:


  • The grey panel should be white (as should the bottom half of the doors). 
  • That silly grille amidships should be removed (its on one side of the models only).
  • The red should extend laterally over a little more than the door 
  • The silver window frames stand out like dogs knobs.
  • The strip amidships along the windows is a dark grey here. It should be black, but I'm hoping I can get away with what's here
  • The white strip up top should be a little taller too (down to the windows) but again, I'm hoping I can get away with it as-is
  • The model in the above pic is a first class car and has a thin yellow line above the windows. This should be painted out and replaced with some yellow in the red door patches that are barely visible on the prototype pic here on the last two cars of the train 

Second class cars disassembled:
 Masked up (note that I have also masked a tiny rectangle to retain that red SBB logo:
 Some paint was then applied. I used Humbrol gloss white. It was a disaster. Enamel whites often are -all creamy-coloured and thin so that they don't really cover anything with white at all - merely a whitey smokey sticky transparent colour. After some internet research, it seems acrylic flat white is the only way to go, so I headed downtown to procure the Tamiya production of same. Lo and behold: success, with a nice crisp arctic white coat over the grey:
Successful it seemed. But either my masking wasn't thorough enough, or more likely the thin runny Humbrol gloss soup seeped underneath, but I was left with a bit of a mess to clean up with a little overflow around the windows and to a lesser extent the unders:

In the next report,  a 2$ paint set will be deployed to step back from this cliff of messiness.

Sunday, September 25, 2016

Back with the Passenger

Greetings dear listener.

I’ve returned to the layout after an absence of a few months but have not been completely idle, for my ebay and bargain-hunting fingers have been toiling over a hot keyboard in the interim to procure a number of goodies that were unpacked this morning.

One of these items is a Swiss passenger train - Marklin’s SBB Eurocity set, “87662”. 


This is a set of 4 cars, which are supposedly: one 1st class car, one 1st class panorama car and two 2nd class vehicles. The set is presented in the ‘previous’ SBB carriage livery of white, black and grey, whereas the current cars lose the grey and look very smart in their black and white with flashes of red; with a little yellow as required to signify first class.


First impressions: These are pretty neat, especially the panorama car which I think is rather nicely done and matches the prototype well. One thing that really stands out with the set, as you may see above in comparison with one of the red hopper wagons that you’ve seen in previous posts, is that they are really, really, really long, so they do look a bit silly on tight curves. 


I thought these red tarp-topped cars below were pretty long, but they seem tiny in comparison. I’ll have to be careful when trains pass each other on curves!


As for the prototype, the real InterRegio trains usually have six cars or more, but four seems to be (literally) an uphill struggle for a single Z scale Re 4/4 (although one of the cars seems a little less free-rolling that the others), four it will be for now. 

The real trains usually have a 4/4 or sometimes an Re 460 on the head, with the occasional appearance of two 4/4s, which if run on the model would enable me to haul 6 or 7 cars if I was to find another set cheaply and sell the extras, as the real trains only have one pano car regardless of length, and on the Gotthard it always seems to be located second car from the north end of the train.

During peak periods (August summer holidays and ski weekends for example) the train can be a almost a dozen cars long, often filled out with older green cars, as can be seen behind the Re 460 picture at Wassen in the previous post.

At the real Wassen, there is northbound/downhill InterRegio train that goes through the station at :20 past the hour and an uphill at about :45. Other Inter City passenger services are provided by Pendolino derivatives of varying aesthetic appeal.

You can see the obvious black and white with red flashes look in the pictures below vs the grey on the models above.


There are a few things I’d like to do to improve these cars, with the most obvious being to get rid of those grey stripes. Other than the Pano car, I don’t know whether the other three are really models of SBB prototypes or (as seems quite common with Marklin) if they’re German cars repainted in Swiss livery. Certainly looking at the prototype pics, there are too many ‘opening’ windows and various details that seem a bit off (those grills in the middle of the 2nd class cars for example) but time will tell whether I care enough about these details to go changing them. We’ll save that for an upcoming instalment.