Monday, May 30, 2016

Together

I've faced a dilemma on the layout for the past week as to whether the two ends of the layout should be joined together (which would enable the track to advance over the middle sections) or to keep them apart (so I can move it in a car if needed) 

After much umming and ahhhing about how to proceed, I decided to 'not-decide', kicking that can down the road by pinning the layout halves together and proceeding with the track laying. If I need to, I can unplug at any time, and if not, I can just glue and reinforce the joins.


Pins and braces
So with that sorted its time to get moving again. Track has now been laid down the Reuss river from Wattinger to the tunnel guarding the lower staging area. Next will be the middle level where the big bridge will be, and as you can see, I’m still revisiting the decision to exclude the hidden spiral at the near end which would give another 4cm or so of vertical clearance between the middle and upper levels of track.


Sunday, May 29, 2016

Self Contained - building a container wagon - 3

Slow progress, but some paint has been slapped on so this thing is looking pretty good (well, from a distance anyway as the closeups can be a bit scary), it runs well, and its almost twice as long as the VTG curtainsider that it was built from. At this rate I'll be doubling my train lengths in no time.


I haven't decided what to do with that blue container. I put a first coat of International Orange on it out of the limited selection of 4 paint colours that I currently own, but don't like it. I might have to break down and buy some dark blue as these colours go fairly well together.I had toyed with the idea of painting it white and putting a 1980s NZR logo on it...

Some weathering and finishing touches will follow in due course.

Thursday, May 26, 2016

Self Contained - Building a container wagon - 2


Just in case you forgot, I'm attempting to building one of these


In the last edition, I’d put together the structural elements of my container wagon - a container load with some bogies underneath.  Now I need to flesh out the actual wagon underframe itself, even though in a reverse of reality, the containers hold things together here and the wagon chassis is just for looks.

The first challenge with the wagon I’ve selected to make (pic above) is that has an edge side sill made of channel or L shaped steel in the center section between the bogies and a full width solid beam (a stick of square section plasticard rod in my case) at the outer ends of the sides. I started experimenting with the center section first, and hit on the idea of simulating the angle with a sheet of plasticard with a super thin sheet of plasticard to simulate the bottom angle of the channel. (He said struggling for steel-engineering-words.) Here’s a sketch:

...and here's how it looks upside down with the “twistlocks”applied, and the solid end bits (complete with attached “twistlocks”) about to go on between the bogies and the container.


One of the things that makes a lot of Z and N models look a bit silly and toylike, is the big high-rider gaps between bogies and underframe needed to provide space for bigger than scale wheels, bogies and couplers. On this, I decided early on to embed the Marklin bogie mount subframe (stolen from the VTG wagon) up inside the containers and this reduce this gap. One of the compromises that I made is that on the real thing the channel section of the sidesill goes out to the bogie bolster but on the model I moved the join inboard a little to clear the bogies. Not that I expect many people would notice.


...and now with those aforementioned solid end square-rod pieces attached.


A prominent feature of these wagons that you can see on the prototype (top pic) is the (ferry tiedown?) hooks that stick out of sidesills above the bogie mount. I’ve stolen these from the VTG wagon. You can see one tiny set of amputated blue hooks on the table in the first model pic of half the the orange container above.

In the pic below these blue sticky-out bits have been attached, and some underfloor detailing added - brake reservoirs, some angles and some flat bits.

A little brass wire was used to add the protective rodding around the blue sticky-out hooks, and one last detail was to fill in the crazy-oversized holes in the roof corners of the orange container which are used to stack model containers on top of each other. I sealed them up with some white round plasticard rod inserted into the previously head-sized openings, and lopped them off flush. In these bottom two pics here you might barely see the handbrake wheel applied to one bogie on each side.

Yeah. A bit more fancy than anticipated as long as you don't look to closely, but not not bad for about three hours work. 

Wednesday, May 25, 2016

Self Contained - Building a container wagon - 1

From where we left off last night:

Building tiny things in a tiny scale would just be silly, but I’ve been thinking a bit about my container train and it all kinda fell into place tonight.

For the bottom half, I bought a four pack of these VTG shorty tarp covered wagons a while back - they’ve very nice, but I don’t need four of them. Best of all, they sit on the appropriate modern Y25 bogies that roll nicely.

Popping the top off, one gets:

Whacking them non-surgically in half with a pair of pliers:
For the top half, some containers from some American stack cars (sorry about these crappy cellphone pics):
Stuck together with some ancient contact glue:

Flipped over:
You can guess what happens next: 
Well that was easy.

Now for the hard bit - prettying it up...

Monday, May 23, 2016

Circle the Wagons


And now for something completely different. Its odd making a model of something you know very little about. 

I’m becoming more familiar with the locomotive types seen on the Gotthard but the freight trains are just colourful images on my camera and in my mind. So today I approached Mr Google and Mr Flickr and enquired about European wagons. 

It’s complicated.

So lets start with something oddly lacking in Z - modern Euro intermodal equipment. From my observations, carted items include:
  • Containers - mainly 40 feet long, but plenty of 20s, some odd-sizes like 30 and 45ss
  • Tanktainers, which are a variation of the above carrying liquids or gasses (and in various lengths themselves).
  • Swapbodies - these are often curtainsided boxes with solid bases and flimsy tops that get offloaded onto a truck trailer chassis - again all sizes
  • Truck trailers - the true piggyback train in American parlance
There seem to be specialist piggyback cars - such as on the Winner Spedition train - wide funky-sided pocket wagons with no ISO twistlocks, and the HUPAC train - whose low-wide wagons seem to traverse the Gotthard at night. Some piggyback cars also seem to take swapbodies perched on top.
Winner Spedition train - piggybacked road trailers in deep well wagons
For the containers and most swapbodies, I can see a myriad of types, presumably exacerbated by a wide variety of manufacturers from many countries. Prominent are:
  • A long skinny-silled wagon thinner in width than an ISO container, with a prominent data board at the left end
  • A deep silled wagon (some with an underframe like NZ’s old CW wagons, others with more angular underframes, some with and some without ribbing under twistlocks), which is also thinner than an ISO container
  • A double unit articulated version of the above 
  • A wagon with funky bendy side sills that’s wider than a container
  • A double articulated set of the above.
  • I’m sure there are more (including the wild Megaswing and similar) but these seem common types
The single unit wagons seem long enough to take a 40 plus a 20 foot container. Quite prominent on the container wagons are enough twistlocks to take a seemingly endless variety of load combos - the twistlocks not in use for a particular load seem to fold down out of the way. 

Three swapbodies of various sizes on deep-sided cars with tanktainers following
Articulated/double version of the deep-sided car 45 foot container
Skinny-sider, with 30 footers?
Various sizes of tanktainers - the near on a funky-sider
Swapbodies balanced on wider cars using little yellow stakes....?! Its all a mystery...

The skinny-siders like the pair passing below (which might be called “sgnss” wagons according to Mr Google), seems like a decent place to start, albeit with containers on top to make things a little easier... 

Sunday, May 22, 2016

Baby I love your curve reinforcers

Mmmm. Flowing curves in flex track always look good, and these are some of the finest I’ve ever pinned down. Here stuck down with Pattex, my most excellent Hollandaise wood glue from The Netherlands, while being pinned in place with various implements. 

Something I despise with a passion on a layout is when twin tracks aren’t laid parallel in curves.

Sometimes this happens because people who aren’t as fussy as I don’t think to do it; and if they are, because of accidentally kinked joins between flex sections or accidentally cutting a section the wrong length. Fixes for the latter: whoops, try again with another piece; and for the former - solder sections together before bending, or plan and cut track as appropriate to move joints out of the tightest areas.

In addition to the aesthetics, much time has been spent over the last days continuing to build out the ‘baseboards’ with longitudinal bracing underneath (faked up in green here as this pic was taken just before it went on) and more support in the ‘grid’ up top.

Nethersides
The layout is in two halves at the moment so they could fit into a car if needed (and they’re easier to flip around during this construction phase), but they will have to come together in the near future.

Saturday, May 21, 2016

Wire Welding

If there’s one thing that heads the bottom of my list of modelling capabilities, it’s sticking two bits of metal together with solder. I’ve always been pretty bad at this skill, no matter how much I read and practice, I just don’t seem to be able to put the theory into action in a consistent and tidy way.

However, tonight I cast aside any fears and sprung reluctantly into action with the welding iron as I need to get some track feeders in place before building can continue. Up til now I’ve built most of the middle and upper levels as removable pieces as it would be too hard getting an iron into track hiding underneath higher levels later on.

My electrical intention, as mentioned earlier, is to weld tracks into strings about a metre long, and then have a feeder connecting each string to a main power bus. The feeders, in addition to the fishplates between strings should provide a reliable power conduit but the gaps between strings will allow for some rail expansion and contraction as the seasons change. I’m not going DCC on this layout (well not at this stage anyway) so things are complicated by having to marshall the electricity into blocks, and further by having a twisting layout where the inside track becomes the outside track and back again in a short distance, confusing my head as which colour wire to attach to which rail.


As for on-off-switchable blocks, I figure I’ll have one for the uphill track, one for the down, one for each storage track (the Micro Trains switches don’t provide any form of electrical isolation), and perhaps one for the big arrival track on the lower level. Each track will have a three position switch so it can be fed from either of two controllers or be isolated when trains are being stabled. 

If trains run at the same speed up and down one might be able to get away with having one transformer set on 50% of power and merely sit there flipping block switches and points to make the trains stop and start...

Don’t look now, I told you this would be ugly. The big red/black bus wire is for the uphill tracks a bus wire for the downhill track is yet to be purchased! All joins have some visible access from either within the hidden sections or from under the layout.

One of the more exciting innovations, derived several ciders into this session, is the DB-patent-pending Bunny Hopper - one feed provided between two strings that powers both. Next time I’ll do this in a cider-less state... 


Friday, May 20, 2016

From up on high

I didn't post this pic on Flickr because the sun wouldn’t come out for me, but here is a view from above the Wattinger bridge looking across the valley at some of the things I’m trying to approximate. On the top level, a covered steel train behind an Re 4/4 and Re 6/6 is approaching The Command Post knob. On the lower level, a plastic fantastic ICN tilting train, also going downhill, has emerged from the tunnel, crossed the Wattinger bridge and is following the Reuss river downstream. 


You can see the incredible height differences between the levels, which is a major struggle to replicate on a 1.9m long layout!

Thursday, May 19, 2016

Storage Wars

As I get bored easily, I like to swap out one consist for another when playing trains, which will require a small storage yard to hold trains that are waiting to come ‘on stage’. Now that the lower level ‘benchwork’ has been plated over, I’ve been fiddling around with my 8 points to see what sort of hidden storage yard might be possible, noting: 

  • Two (ideally left handers) are committed to the passing loop ‘up top’ 
  • As for train length, the 12 car coal train plus two locos is 80cm long, and this seems to be about the limit for these locos. However the newer Y25 bogies ‘seem’ to run more freely, plus longer container wagons, some being two-unit articulated jobs with three bogies, might allow longer trains to be run. 
  • Passing tracks are usually more functional than dead-end sidings that you have to push things in and out of
  • A transfer table is probably impractical here. 
  • Points are often the weak link where the most derailments and electrical issues occur. I’ve no idea how good these Micro Trains things are, or how they’ll hold up over time.


The above gives me two 100cm and one 140mm ‘departure' tracks at the bottom, and another 60cm track on the ‘arrival’ track which could potentially be longer or skipped altogether - two trains could queue up on that long arrival track. The ‘up top' track is about 120cm long, so that could be an issue if longer trains prove feasible. It could be extended, but this would further reduce the visible track on the already shortened upper level by The Command Post.

The points are fairly well spaced apart from the two at bottom right that are next to each other, and all are pretty accessible for hidden trackwork.


Wednesday, May 18, 2016

Flexing

The intention for Wassen was to use flextrack as much as possible for the visible bits, and sectional track for the (primarily hidden) tight curves used to get track between levels.

In any scale I’ll pick Peco Streamline flextrack, as I love its length, the way it bends, the forgiveness of the plastic sleepers, and 'Streamline' just seems to be the best name ever for flex. Kudos to the Peco Marketing department (who is probably also the founder and lavatory cleaner). I managed to pick up a box of Z for a good price although I also have some short 220mm lengths of Micro Trains flex. For sectional pieces I’m using Rokuhan, and so far I’ve been impressed with them. To add more confusion into the mix, I have 8 untested Micro Trains switches from a previous life. 

No worries, they’re all 6.5mm wide right? Alas they’re not all the same height. Any minor differences in rail profiles/heights can be sorted out pretty quickly with the judicious application of a file to the offending rail head, but to further complicate things, the sectional track and points have moulded ballast roadbeds of varying heights depending on the manufacturer. Not wanting to place 3mm shims under the flex track unless I have to, even though 3mm foamboard probably exists somewhere, I’ve decided to tackle my first piece of flex by simply raising the foam board base by 3mm where the flex will be. This gives me the same consistent dark surface that will be easy to pin my track to and cover with ballast/scenery.
Level pegging
The flextrack is temporarily pinned in place below and the various bends have been seasoned to taste after viewing it from various angles. Knowing where the track will finally go allows the black foamboard to be narrowed where the Wattinger curve bridge will go. I’m trying to do any foamboard hacking before the track is fixed down to minimise chances of buckling the track or upsetting soldered rail joints or feeders.


Tuesday, May 17, 2016

Reality Bites

One and a half compromise decisions have been made over the last two days.

Firstly, my original premise was basically a big double tracked loop of track (with some squiggles). Uphill trains would head up to the top and the back down using a hidden helix, and from there they can  run back up again. Downhill trains on the other track would do the same, thus if you wanted to, you could leave the thing unattended with an uphill and a downhill train running all the time.

I’ve since come to the realisation that this can’t work. Its not the doubling of track (all hidden) that bothers me that much, but I haven’t been able to fit in two conflicting spirals into the vertical space I have without them arriving in the same spot at the same height. It can’t be done without widening the baseboards or compromising the visible pieces of the layout. 

A simple solution does exist - simply joining the two main tracks when they get to the top with a 'balloon loop' shaped connection. 


When a train arrives at the top on the left hand track, it turns around and heads down on the other track (normally left hand running on Gotthard). At the bottom level, the train will loop around in the same fashion and head back up. So now the layout is more of a dogbone shape, with the middle section being the visible two-track mains, and the end-bones being my hidden reversing connectors.

This makes construction easier, eliminates the need for a lot of hidden track and simplifies internal access to hidden bits for ongoing maintenance and cleaning. A passing loop at the top gives me the opportunity to run a train up and hold it, sending another down, rather than every up train having to come straight back down again immediately to free up the track. Similarly, I’ve now got a flat area at the base of the layout where I can have a few storage tracks. A little more scenery on the top level will now be hidden in that loop alas.


The second decision, which I’m counting for half because I’ve assumed this for some time now and I might revisit it in the upcoming weeks... but for now, I’ve accepted that there won’t be a hidden loop at the ‘right' (far end above) which was intended to add another 4cm between the between the middle and top levels. I’ve almost come to terms with it.

Monday, May 16, 2016

Moving Pictures

Proof in video, although it sounds like there's a cat going through a wringer somewhere in the background.

While the tail track to the right is just temporary, this will be the view flowing through Wattinger curve, into a tunnel in the foreground, out again and across the upper Wattinger bridge on the curve at left, and then into a tunnel before proceeding around the upper spiral (hidden). The train will re-emerge where the tracks end here on the mid-level and proceed to the big bridge.


Sunday, May 15, 2016

Rollercoaster

It had been my intention to build this layout on a flat base - a hollowcore door, or a thick closed cell insulation foam slab. Not being very good at planning layouts to the N-th degree before starting, I prefer to build and plan iteratively as I go. Having a flat, stiff baseboard helps me ‘see’ the size of the project and position things on it so they work for me visually.


This is not the way things have worked out here...

Firstly, my foamboard 'gradient trial' has developed a life of its own, to grow like a proverbial spaghetti monster extending its black noodly appendages across all three levels of Wassen. 

Coney Island Cyclone

It turns out that not only is the 5mm foamboard easy to cut and glue together, everything is coming together so fast that building in it has become addictive. While constantly referring to the big-picture objective in my mind, I’m able to plan one or two steps ahead, prototype it to see if it fits, and tweak things as I go which has helped me ‘see’ how things will work and what needs to be moved to make the scenes look right.

A second contribution to this way of thinking came from the Head Druff, who let slip a throwaway line while reviewing early progress on a site visit a few days back - "why not build a few angle girders from foamboard and start there”. That sounded far too professional to me, but did spark a thought given that a Knaufboard foam slab the size of a door costs $130 at Bunnings.

So I’m experimenting with using strips of 5mm foamboard to tie all my makeshift grades and temporary support legs together, and bolstering them with braces and some ‘girdering’ components on the bottom. Much of the work has been done with quite thin 2.5cm strips of 5mm foamboard. Additional stiffness in some areas will be provided by a sheet of the stuff under the hidden ‘yard’ at the back of the lowest level of the layout. 

Compared to the traditional approach of building up from a flat, rigid baseboard, effectively this is similar to the way automotive design evolved from having a stiff ladder frame with a body stuck on top, to using only a monocoque body that in itself provides all the strength needed.  

It seems to be working, hopefully when the glue has set it will prove strong enough, and as mentioned before, its a really fast way to build a layout. If things are still a little flexy, I’ll follow the Druff’s suggestion and throw some stiffer girders underneath or encase the outside in wood.

Saturday, May 14, 2016

Testing... 1.2.3…

Now that I have some track welded up, I need some inclined roadbed to sit it on. 

I’ve decided to use foam board for my test as its easy to cut with a modelling knife, can be glued with PVA white/wood glue, and I happen to have some sexy black pieces on me.

I figured I’d test the tightest curve radius I have (170mm) because there is always more wheel-to-rail friction on a curve. I cut out a curved roadbed section and put some feet on it to give a 1cm rise in 30 cm of track. This is close to the prototype grade and I figured when this didn’t work I’d trim the legs under the grade until i got something that did work. 


You can see the temporary legs being added here, and in the background, completed strings of welded track.

The 12 wagon coal train was attached to a pair of Re 4/4s, power applied and... crikey, it works!


Jeepers these locos are noisy, and this train doesn’t roll that well, but the grade can be summited on half power. Ok! Concept proven, albeit this is about as long as the trains will be (although the wagons with the more modern Y25 bogies seem to roll more freely).

Experiments in Trackage

The first thing I need to do to see if my squiggly plan is even remotely feasible in practice is to see what sort of train a pair of tiny, light Marklin Z scale Re 4/4s can pull up a grade.

The Importance of Grades

At 'Wassen in the real world’, the three track levels are quite some distance apart vertically, and if I cannot gain a visual representation of that, my model is going to look flat and silly. On such a short layout, every vertical mm helps the effect, so whether my models will go up a 1:50 or 1:30 will make a big difference in the visual spacing between my three track levels. 

There is another key thing that the ruling gradient impacts given my space constraints - they define what radius is needed to make a loop-de-loop. If trains will only run up a shallow grade, one needs a longer track run (bigger radius), to gain the required vertical clearance to pass over over a loco (with pantograph extended) on the lower track, which means spirals take up more space on my small layout. Conversely, a steeper working grade means you can use a smaller radius which takes up less space. 

To figure all this out, I need a powered test grade and see what happens. Thus, I need some track.

Flex vs sectional

Which leads me to a completely different issue. In a Z layout with plenty of hidden trackage, the last thing I need is derailments and stop-start operation. I had a brainwave early on to go with sectional track (remember that?!) for perfectly smooth tight circles for the hidden stuff and use flex for the sweeping visible sections.  I already had some Microtrains flex and points and picked up some extra Peco flex, but decided to go with a newish player in Z called Rokuhan for the spirals, as their track has a good reputation for reliability and they have an excellent variety of curve radii, not all of which are toy-train-pizza-layout tight. I picked the track up from Frank, the Z Scale Hobo.

Electricity

Remembering back several decades to bad experiences as a kid with beaten-up old sectional track, I worry about how reliable all those rail joiners will be over time in Z - there’s nothing less fun to operate than a layout with poor electrics and stuttering trains. 

I guess there are two options here. One is to have power feeds to every piece of sectional track (as I struggle to solder wires to rails three times the size of Z scale ones, the thought of attempting this worries me), or else solder strings of the sectional tracks together at the fishplates and apply one feeder to the completed string. The latter approach seemed more feasible to me, but my first attempts to solder sections together were a struggle to get enough heat without melting the plastic track base. So I tried soldering feeders to the wee brass nubs on the underside of a piece of sectional track: even less successful. 

Soldering

Finally I seem to have my thermit welding process sorted. 
  1. Apply flux around the rail joiner on the 'outside-side' of the track
  2. Press hard with the solder from the outside of the rail to counteract the force of pressing hard on the inside of the rail with the soldering iron
  3. All going well, if there is good contact between the iron and the rail, things heat up, followed by a little sizzling, followed with solder flowing into the joint after a few seconds. if not, reapply heat with the tip at a slightly different angle
  4. File down any leftover solder on the tops of the rails


Whew. I’ve been soldering things together into strings of usually 4 curved sections (180 degrees of curve) and will apply a power feeder to each. Between strings, I'll use normal (i.e. unsoldered) fishplates to allow for the expansion and contraction of the rails that comes with the seasons. Having said all of this, the fishplates on the Rokuhan track seem very good, but I’m playing it safe with the solder and feeds as backup…

Public Service Announcement

Polyester socks are less effective than steel capped boots when you drop your soldering iron.


Taking Stock

My Rolling stock wish-list for a modern-era Wassen layout

  • A passenger train with an Re460. Marklin makes a decent looking SBB passenger train set including the panorama car (albeit all in a previous livery).  They also make plenty of Re 460s in weird liveries but its almost impossible to find a red one (and they probably all have the old three pole motors (why on earth can’t they produce a new one in red?)
  • A freight train with Re10/10 (Re4/4+Re6/6). Marklin makes a delicious Re 4/4 that can still be found, but unfortunately nobody makes a 6/6 these days, so it would have to be a kitbash or Shapeways effort. SZL had a short run in brass a long time ago and there are Japanese bo-bo-bo chassis available… In the meantime it’s Re 8/8s all around… 
  • An intermodal container train - maybe with modern BLS power or Re10/10 plus a 4/4 at the back or DB 185s. Unfortunately there seems approximately zero modern euro intermodal stuff in Z and the BLS locos would have to be kitbashed.
  • A coal train - not sure if they really run these over the Pass, but I just fell into 12 of these wagons, so an Re 10/10 or 8/8 would be the power, or a pair of DB 185s if I could find some.

So far I’ve accumulated some Re 4/4s, the coal train and half a freight train.


Other possibilities
  • Open steel train (old BLS brownies)
  • Closed steel train with telescoping-cover wagons  (Re 10/10)
  • ICN plastic fantastic railcars 
  • The little Mail Train (Re 4/4)
  • Tank train (Re 10/10)
  • Winner piggyback train (2+1 DB 185 locos or Re10/10 plus a 4/4) 
  • Holcim hopper train


Friday, May 13, 2016

Beyond a spark - track planning

My initial thoughts for a layout were based around whether a reasonable representation of Wassen could be built on a door-sized piece of real estate. Obviously this would have to be done in Z scale (or smaller!) to work, and given the size constraint, serious compromises would have to be made to realise this without looking too toylike -  one of my issues with Z scale layouts I've seen in briefcases, guitar cases and pizza boxes. 

The plus of sticking to this size is that it would be a one-piece layout (module track joins between multiple tracks at different levels sounds like a recipe for disaster) which would be fairly portable and could potentially fit in a station wagon or van.

Downsides of Z scale itself are that there's only limited models available (no Re 6/6 and no modern container wagons for example), and having never really done anything in the scale before, I imagine its daunting working in such a small scale with its fiddly details and need for super smooth track work to prevent future problems.

So one could do N or one could upscale the layout size, but then the portability would be lost. So lets see what could fit onto a door in Z.

The real Wassen looks like this:


A pure, scaled-down Wassen would be more than 10 metres long so as with all semi-prototypical modeling, selective compression comes into play. The 'signature scenes' I’d like to include would be…
  • Wattinger Curve and bridge
  • The big Middle Meienreuss bridge with third level bridge behind
  • Wassen Church and a smattering of Wassen village
  • The ‘Command Post’ on the upper level
  • The ‘other’ upper Wattinger bridge could easily be included
  • The curved approach to the Muhle tunnel might be possible too.
Although the A2 Motorway is a large visual component cutting through the real scene, in my fantasy Wassen I feel it would dominate such a small layout and take up too much space so will be excluded/merged with the local road.

My rough concept mocked up in trackplanning software (badly, and of course for a layout plan, over-optimistically) is thus:


Basically three levels of double-track are linked by hidden spirals to gain additional height for increased visual separation of the levels. 

An uphill train would emerge at the Muhle tunnel traveling ‘left', where the track comes out of hiding, curves under the Wassen church, runs alongside the Reuss river to the Wattinger curve and bridges, re-emerges heading ‘right' on the middle level to cross the big bridge, curves into the tunnel there, re-emerges facing ‘left’ briefly between tunnels in the background to cross the upper bridge, then pass the command post on the upper level before vanishing for good.

Then the track has to get back down to ground zero to start again…. Somehow…!


p.s.  I've probably mis-spelled all the locations and obviously mis-pronounce them too. Apologies!

Tuesday, May 10, 2016

Hooked

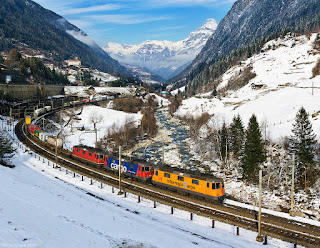
The Gotthard Pass is one of those places I’d wanted to visit for some time, and that time finally arrived in October 2015. I’d previously noted that Switzerland is like a 1:1 model railway, with picture perfect mountain backdrops and not a weed or stick of dead grass to be seen; but the town of Wassen is something else.


The Pass itself is a major north-south freight route between Italy and the countries to the north, primarily Germany and The Netherlands. On each side of the pass, continuous steep grades, dozens of tunnels, countless bridges and multiple loops and horseshoes allow the track to gain enough altitude to reach a 15km long summit tunnel. The ‘North Ramp’ following the Reuss river between Erstfeld and the summit station of Göschenen is probably the most visited bit, and not far below the summit lies the railfan mecca of Wassen.

Here at either end of a tiny village, a pair of 180 degree horseshoe curves, almost entirely in tunnels, provide three levels of track that wind their way up the hillside, such that passengers pass the same church three times on various sides of the train as they travel the line. With plenty of trains and dozens of photo positions including the famous Wattinger Curve easily accessible with a little walking and climbing, I was hooked.

With a new 57km long(35 mile) basistunnel due to open underneath this spectacle in June 2016, the future for the old route is uncertain, so for the next few months its bound to be flooded by railfans like me hoping to catch a first or final glimpse of the line in its heyday. If you fancy a visit, there’s no time like today.


The only problem on my own trip, was the weather, with the sun threatening to make itself seen over the mountaintops between 11 and 3, but only managing to pop out from under mountain mists surrounding the deep valley for between zero and fifteen minutes on the three days I was there. As you’ll guess, this was usually when there were no trains to be had.

What an amazing place though. Exploring the hills, eating schnitzel with mushroom sauce, drinking appfelwijn (cider) and watching the chunky old electric locos snaking their trains around the old town was an incredible experience. 

I just had to go back. 


Booking a second visit in February in the hope of getting some sun seemed like a bad idea, with the forecast promising a week of miserable weather as the date approached. Indeed the trip down from Zurich was made in light drizzle and the next day that drizzle turned to rain and then snow. On the plus side, sun sometimes follows snow, and lo and behold the next day dawned clear, so I was up at the ‘command post’ overlooking Wassen for sun-up and spent one of my most memorable days ever photographing trains.


Towards the end of my first visit I wondered whether it might be possible to model some part of the Pass, preferably Wassen of course, in Z scale… I've never modeled in Z, but had collected a bit of track and US rolling stock for another project that never materialised.... And that’s what brings us here.