Showing posts with label painting. Show all posts

Thursday, November 7, 2019

Marklin's Re 4/4 - Improving the looks - 4 - Roof

Most of the SBB Re 4/4s that I saw on the Gotthard were clean enough to see that they had a silver/light grey roof:


Whereas the Marklin ones have the same dark grey used at the base of the body. This isn't a terrible faux-pas because the roof weathers with carbon from the pantograph over time, but I felt that painting the roof silver might make an improvement visually.

Before that was done, the bolt hole for the Marklin panto would have to be filled in.

And indeed it was with a rectangle of thin .010 plasticard; and a square of plastruct ladder that had been thinned down a little was attached to the top of this to 'lift' the new panto off the roof a little as the real one is. My structure isn't entirely prototypical but I think it will look fine when the etched panto is glued on top.


Then I decided to bite the bullet and paint the roof silver - a risky endeavor that could end very messily, but with the aid of my magnifying light and a very subtle demarcation line that exists on the shell, it wasn't as hard as I had feared (although in these harsh closeups it looks like I need to touch up one bit that I didn't notice with the naked eye):

Per the prototype, you'll see that the larger grilles were left the Marklin gray colour while the center one was silvered up.


In the above pic you may note some thinned black added to those end grilles and in various shades to the roof as the first step in the weathering process. There seems to be a distinctive pattern to the Re 4/4 tops, with the dark panto-droppings down the centre, and often a little rust on the sides of the cab roof. The locos must be cleaned fairly regularly, as other than the tops of the roof and some occasional fading of the red, most 4/4s I saw at the time were in reasonable nick.

After this pic was taken, some dullcote was sprayed on and chalks applied to make the effect more subtle. More on that tomorrow.

Friday, July 27, 2018

The ugliest backdrops ever created...

After much procrastination, I've decided to complete the white foamboard backdrop around the layout. As you can see, the prefab scenery panel in the middle of the top level was removed so that the backdrop could be painted behind it.

This was painted a sky-blue-ish shade... and despite me using some putty to smooth minor imperfections in the joins, I'm a bit bummed that you can see them more clearly now that the blue has been installed. This may be because of the directional lighting coming in from the right...

I also used a pretty crappy brush while applying the blue which has left some horizontal strata that also picks up bright light sources from above. Drat. Definite blue-fail.


On my last layout I experimented with super realistic photo-backdrops but here I've moved to the opposite extreme and really dumbed things down. I didn't even graduate the blue with white towards the horizon or pop any clouds in... Because Switzerland's weather is always perfect blue skies... Not.

After the blue had set, some green paint was mixed with the sky blue colour (distant things almost always inherit a bit of sky colour) and this was used to paint some rudimentary 'hill forms' behind where the scenery will be. I then used the green (which is a reasonable approximation of my pine tree colours) to vertically daub on some distant 'trees'. These are not intended to be representations of anything specific, but break up the solid colour of the 'hills' in the distance.

As you can see below, this is pretty ugly when viewed au natural...

However with the prefab scenery installed in front of it in the picture below, you can see how the ugly duckling is transformed an appropriately vague backdrop rendered in appropriate shades of nothingness that doesn't scream at you. For once, I completed painted the backdrop all around the layout, even to the ends which don't have much scenery on them yet.

Other than the messy blue I think I've gotten away with it.

With the backdrop not even dry, the prefab scenery was finally glued into place so that some overhead wiring poles could be installed on the top level of track..

Tuesday, May 22, 2018

Steel Shims

I received another second-hand telescoping steel wagon (UIC classification of 'Shimmns' I believe, which is probably the French or German word for "steel wagon") on yesterday's owl.

While preparing to weather it up to match the two already done, I pulled out the brown DB one that hasn't seen any love yet, and decided to give it a repaint.
New blue SBB and DB brown Shimmnses.
As the SBB ones are a shade of greeny-blue,  dabs of green and a nasty blue watercolour paint were squirted onto a makeshift palette, together with some white, in case things needed to be lightened up a little:

A little blending (I probably over-lightened it):

Close enough for government work:

Some weathering was added after looking at a few prototype pictures, which revealed that the real things are a real mix of sun-bleaching (particularly on the raised bits of the ribbed sides), but also are covered in coal dust and carbon (from the overhead presumably) in the crevices.

As before, this was approximated by drybrushing the bogies with some brown, and washing the body with thinned black and some streaks of browns and light colour. White soft pastel from the "Tamiya Weathering Master" box was applied to the ridges of all four wagons, as can be seen in the mini-mini steel train below, which is passing the Transwaggon train which doesn't seem to have moved far over the past few weeks!

Thursday, January 18, 2018

Being Articulate - sggrss 3

A splash of paint and the sggrss articulated flat will be ready to take on the world.... or at least the layout.

As with most of the Euro articulated stock there are may detail variations and plenty of paint schemes - gray, blue, red, brown, yellow, green, black to name a few I've googled recently.

I decided to make a dark gray one for no real reason other than its something different and the brighter colours tend to highlight the shortness of the 40 foot platforms and the droopy hanging sides which, as I mentioned earlier, look a little odd being offset inboard from where the containers sit.


So some grey was slopped on - as I mixed it to taste, I ended up with a few different shades, which I rather like. Many of these wagons seem to have sections with the numbers/data that get cleaned more often than the other bits, so there is often quite a bit of variation in the prototypes.

Yellow was applied to the tie-down-extension-pipes and to represent twistlocks. I should have used tiny squares of plastic for these since I put so much effort on those vertical strakes.  The containers had been weathered earlier and the wagon might get the same treatment at some stage.


And there you have it. It looks pretty decent and the 2x40 footer doesn't look as silly as I had feared. 

Soon enough I'll get the layout running again and we will see how well it runs!

Saturday, January 13, 2018

Cheap and Nasty Container Carrier - 2

To finish off this nasty and quick container wagon, a strip of square section plastruct rod was secured along the bottom of the containers and a trapezoidal drop-side added from sturdier rod as a representation of the platform body.


Rather than add a lot of details, I scribed in some vertical lines to represent the stiffening ribs (which should have been done properly as '3d' items but couldn't really be bothered for this wagon. I also painted on twistlocks in yellow and took a picture of it.

It looked blah, so I added the tie-down extensions above the bogie bolsters using squares of plasticard rod, and the protective pipe-bits around them using fine wire. Then I added squares of fine plasticard to represent the twistlocks over my badly painted jobs.

I didn't take many pictures of these steps in the tidying up of this quick and dirty wagon as I wasn't that enamoured with it during the process.


But after repainting some grey over the mess and picking out the twistlocks and tiedown extensions carefully in yellow, plus some random squares in white to represent fictional reflector strips and signs it doesn't look to horrible after all.

This is a trick I learned in 1:120 - painting on some random squares here and there and picking out details can make a model look a lot more detailed than it actually is. I've recently added such paint-'lies' to the blue wagon as well and it has tarted that up quite nicely as well.

A little weathering was applied using Tamiya Weathering Master soft pastels - mainly brown streaks on the wagon body and a little white and black on the containers, over acrylic washes that had been pre-applied.

Sure the containers are a bit small, but on the real Gotthard trains, the containers and swapbodies come in all sizes and shapes so this doesn't look so bad hidden amongst a string of wagons now that it has been finished off.

Thursday, December 8, 2016

Beginning some scenery

View from the front for once...

It's been a long slog slaving over a hot soldering iron of late, but now that the mechanics are in reasonable shape it feels like time to start growing some scenery...

All layouts are exercises in compromise, and this one especially so as it tries to fit several kilometres of climbing and winding track into the size of a door.  Mechanically it all fits and it runs, but in terms of the layouts overall effectiveness, the rubber hits the road when the scenery goes in.

For here we find out if the various features 'fit and work' as we'd hoped.

The first thing I need to do is to add some bases for things like rivers and roads that are had to add level and flat after the hills start growing.

Here we see a simple flat white card base for the Reuss river as it passes under the 'upper' and 'lower' (where that wagon is) Wattinger bridges. The famous Wattinger curve lies just beyond, and in the distancee, the tracks go under a plinth-like table structure which is where the landmark Wassen Church will sit:

At this stage, I decided to paint the rails brown as it's easier to do this before they get enveloped in tunnels and cuttings:

A piece of unpainted track in the background for comparison...

I used some Tamiya acrylic brown that was lying around and a fine brush. In past lives, I've sprayed automotive primer from a can, and although this is fast, it tends to be quite red in colour ...and gets everywhere...


Thursday, November 3, 2016

InterRegio - 3

Things proceeded at pace during a few short visits to the trainroom today.

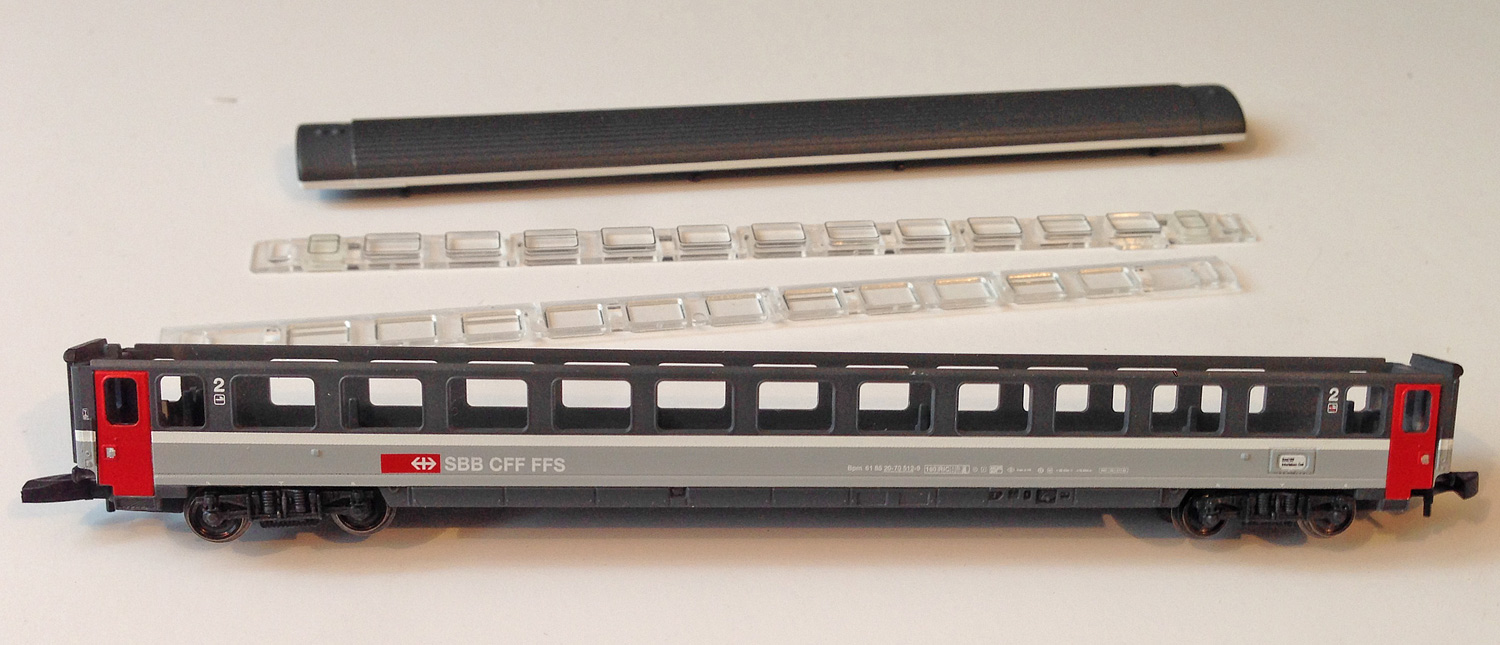
The first class car came apart and was processed in a similar fashion to the two 2nd class cars. There were subtle differences - there are no end steps so the masking tape covering the unders didn't have much to hold on to and the 'gotcha' at the end being that the 4 pieces of 'glass' window inserts went back in a specific order and not in any other way.

The Marklin Panorama car is a bit different in its construction. Rather than the roof coming off, the body comes off the chassis on these, and the main curved glass pops out from the outside:
Despte this, it was tackled in a similar way to the other cars.

The roof grey had to come down a bit more than on the existing livery so I scored a line down to the appropriate distance with a knife and hand-painted down to it with a similar shade of custom mixed grey.

The red patches on the ends are a bit bigger on this car so my painting with the $2 paints ended up a little more lumpy. I also went mad and hand painted the yellow strip on top of the red that signifies first class on the prototype. This worked out considerably better than expected so the same was also applied to the first class car.
 All in all, the train looks rather decent I reckon:

The real heros have been the black marker covering up the silver window frames and the acrylic paints - especially the Tamiya White. These are touch-dry in minutes so you can be on to another colour in no time, so my attacking of this passenger train was reminiscent of a bull loose in the proverbial china shop.

Just as a reminder, this is what they looked like a few days ago.

InterRegio - 2

Continuing on from yesterday, a little red paint was splashed around the ends and the messy overspray cleaned up in dark grey  - both hand-painted using my 2$ set of lumpy artists paints purchased from The Warehouse or some similar dollar-store.

The raised silver window frames were then drawn over using a marker:


And after reassembly, things were looking pretty sweet. The two modified cars are at the right compared to a stock car at left:
You can compare these to the prototype at the head of this blog. Close enough that a galloping racehorse wouldn't notice.

And from the Scary Closeups Department, modified car are at right compared to a stock car at left:

I'm impressed with the deletion of the silver windowframes but do need to make up some "SBB CFF FFS" decals for the sides.


Tuesday, November 1, 2016

InterRegio - 1

As you may recall, I picked up an SBB passenger car set recently.

The set is a car or two short of what I would ideally like to see on the layout, although a single loco will probably struggle to pull more than four cars up the hill anyway, so that's moot...

Other than this, the main concerns with the cars are that:

  • they don't run that well 
  • they're in an older paint scheme

Hopefully that the former will be sorted out by my ongoing remedial trackwork tweaks and some adjustments to the unders - I have a feeling that the couplers are catching the buffers on sharp curves on at least one of the cars. Another car 'drags' a bit - as if a wheelset or two is rubbing on something.

The livery issue I'll tackle now - buoyed by the illusion of recent successes on the Habbiins wagons by the 51st Airborne Paint Application Corps.

So looking at the as-delivered models vs the real thing (as provided by the VGB Gotthard book), we can see that:


  • The grey panel should be white (as should the bottom half of the doors). 
  • That silly grille amidships should be removed (its on one side of the models only).
  • The red should extend laterally over a little more than the door 
  • The silver window frames stand out like dogs knobs.
  • The strip amidships along the windows is a dark grey here. It should be black, but I'm hoping I can get away with what's here
  • The white strip up top should be a little taller too (down to the windows) but again, I'm hoping I can get away with it as-is
  • The model in the above pic is a first class car and has a thin yellow line above the windows. This should be painted out and replaced with some yellow in the red door patches that are barely visible on the prototype pic here on the last two cars of the train 

Second class cars disassembled:
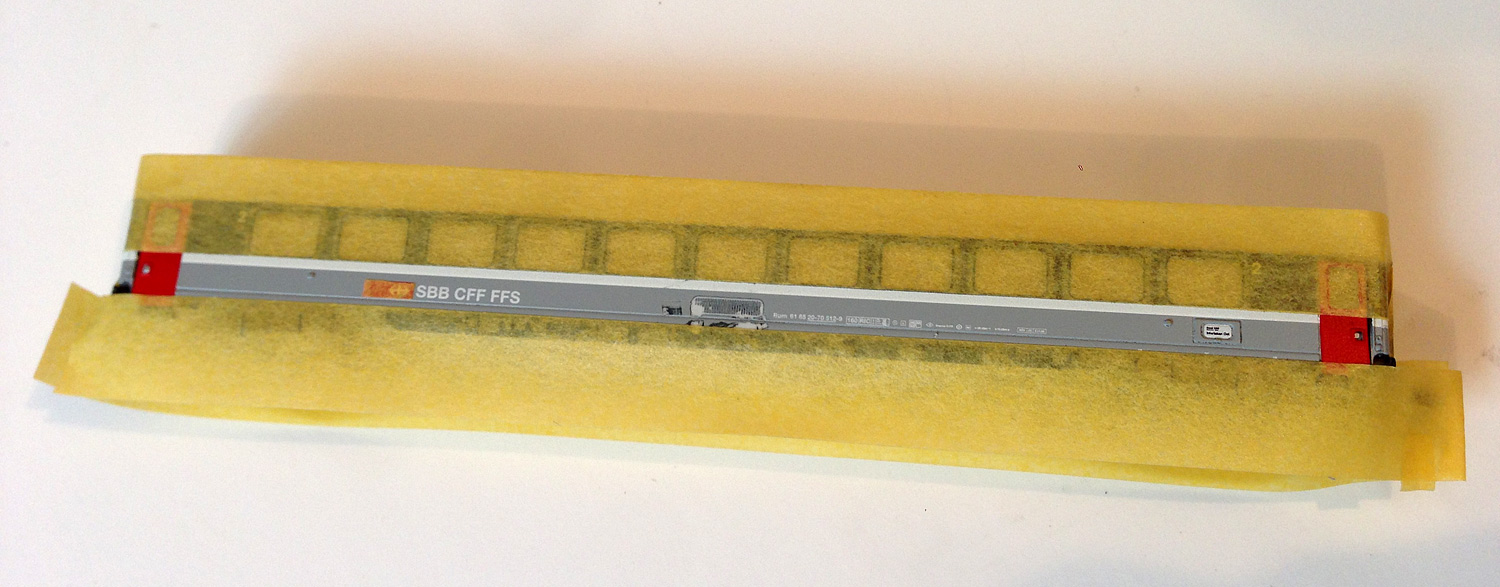
 Masked up (note that I have also masked a tiny rectangle to retain that red SBB logo:
 Some paint was then applied. I used Humbrol gloss white. It was a disaster. Enamel whites often are -all creamy-coloured and thin so that they don't really cover anything with white at all - merely a whitey smokey sticky transparent colour. After some internet research, it seems acrylic flat white is the only way to go, so I headed downtown to procure the Tamiya production of same. Lo and behold: success, with a nice crisp arctic white coat over the grey:
Successful it seemed. But either my masking wasn't thorough enough, or more likely the thin runny Humbrol gloss soup seeped underneath, but I was left with a bit of a mess to clean up with a little overflow around the windows and to a lesser extent the unders:

In the next report,  a 2$ paint set will be deployed to step back from this cliff of messiness.

Monday, October 31, 2016

Whazza Habbiinsing - airbrushing a boxcar silver

Wassen, Dec 2015
Some of the more distinctive trains seen at Wassen were boxcar trains. While there are a surprisingly high number of four wheeled boxcars running around for this day and age, they are mainly of this 23.3m long silver bogie type, of which some (or all, or many) may be of the classification "habbiins" or something similarly mysterious.

Often they run in clumps like the above train (which may be carrying paper), but they will often pop up in general freight trains too. Many have silly yellow "Transwaggon" labels on the side as below, but that's completely reasonable since that seems to the company that owns many of them in these parts.

Tosh-railways is a nice source of pictures of these and other Euro wagons


As seems to be their business model, Marklin produces a range of weirdly painted "collectable" wagons of this style in Z scale, yet they don't seem to make (and may never have made) the silver ones that a Swiss modeller might actually like to buy a few of.

Fortunately I managed to pick up a few older stragglers off ebay that would be suitable candidates for Transwaggoning.

 And with a quick de-topping:


Now I decided to do something out of my comfort zone: use an airbrush to paint them silver. I'm not much of a player in the dark arts of airbrushing. In fact I've only airbrushed one model in my life, but here I am, seeing if this equipment still works.

Before slathering the silver, I thought it might be interesting to mask off a few areas that could allow some factory-painted details to remain.

I've not used Tamiya masking tape before but boy is this stuff great. I used the blue calipers below to measure the width between panels and then cut off a few rectangles.... and applied them as you can see here on the wagon's lower end as it appears in the pic:

The stuff cuts easily with a knife, is forgiving and holds a line well. I taped off the roof centre and end walls on the white PanGas one for something different:

Out with the air blowing equipment: my old Aztek airbrush with a few nozzles that aren't completely clogged up with old dried paint, indecipherable airbrush instructions, a spray booth made from a card box, a nearby window is open to prevent me dying, paint, thinner, pipette, mixer, kitchen towels for the inevitable mess, latex gloves that I forgot to wear:


And a stick to hold the wagons with: old foamboard offcuts taped together:


Work in progress:
 And with the little masking tape pieces removed:
All in all pretty decent. There's still a little of the previous paint showing through, especially on the dark Marklin one.

I could give them another coat, but I'll probably just apply some weathering to hide it.